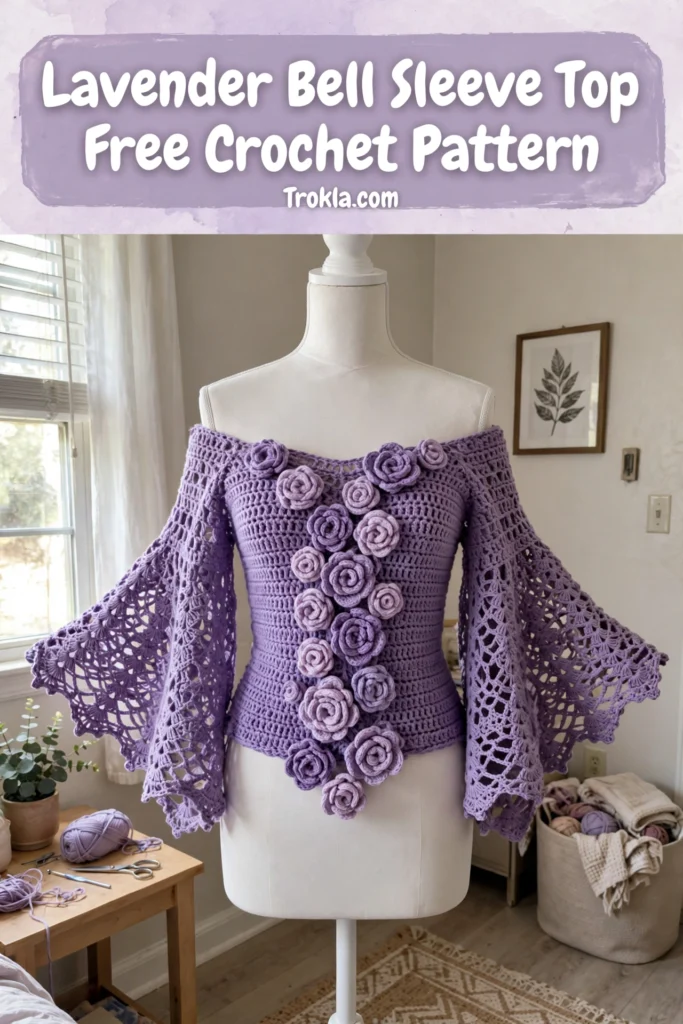
# Lavender Bell Sleeve Top Free Crochet Pattern
There is something absolutely magical about a garment that makes you feel like you just stepped out of a romantic garden party. This lavender bell sleeve top is exactly that kind of piece — an off-shoulder neckline, dramatic lace bell sleeves, and the sweetest little 3D roses cascading down the bodice. I designed it for intermediate crocheters who want a challenge without the overwhelm, and I promise the construction is simpler than it looks.
Here’s my secret: break it into components and it all feels manageable. The bodice is straightforward single crochet in the round. The sleeves are lace motifs you sew into a cone. The roses are tiny spirals you make while watching TV. Nothing fancy, just one piece at a time — and then suddenly you’re holding wearable art.

What You’ll Need
- DK weight yarn (category 3) — a smooth cotton or cotton blend gives the best drape:
- Main color: light lavender/periwinkle, approximately 800–1000 yards
- Contrast 1: deep purple, approximately 50 yards
- Contrast 2: medium mauve/dusty rose, approximately 50 yards
- Contrast 3: pale sage green, approximately 40 yards
- 4.0 mm (G/6) crochet hook for the bodice and sleeves
- 3.5 mm (E/4) crochet hook for the ribbing and appliqués
- Tapestry needle, stitch markers (at least 8), scissors, measuring tape
Finished size:
- Size Small — bust 32–34 inches
- Length from underarm 14 inches
- Sleeve length from underarm 18 inches
- Bell sleeve circumference at cuff 20 inches
Gauge:
- with the 4.0 mm hook in single crochet, 18 stitches x 20 rows = 4 inches. This is a fitted garment, so check your gauge — really

The Pattern
Part 1: Ribbed Neckband
This stretchy ribbing creates the off-shoulder look. Work it flat, then join.
Using the 3.5 mm hook and main color, ch 11.
Row 1: Sc in 2nd ch from hook and in each ch across. (10 sts)
Row 2: Ch 1, turn. Sc in back loops only across. (10 sts)
Rows 3–120: Repeat Row 2. This makes approximately 26–28 inches of ribbing — adjust rows to fit your upper chest measurement plus 2 inches of ease.
Joining: fold the ribbing so the short ends meet and sl st through both layers to form a tube. Do not fasten off.
Part 2: Bodice
Switch to the 4.0 mm hook. Pick up stitches along the bottom edge of the neckband and work down.
Setup round: Ch 1. Work 120 sc evenly spaced around the bottom edge of the neckband, placing stitches in the row ends. Sl st to first sc to join. Place marker. (120 sts)
Rounds 1–4: Ch 1, sc in each st around. Sl st to join. (120 sts)
Round 5 (bust increase): Ch 1, (sc in next 14 sts, 2 sc in next st) around. Sl st to join. (128 sts)
Rounds 6–10: Ch 1, sc in each st around. Sl st to join. (128 sts)
Round 11 (increase): Ch 1, (sc in next 15 sts, 2 sc in next st) around. Sl st to join. (136 sts)
Rounds 12–30: Ch 1, sc in each st around. Sl st to join. (136 sts)
Part 3: Armhole Division
Round 31: Ch 1, sc in next 34 sts. Ch 8 (underarm bridge). Skip next 34 sts. Sc in next 34 sts. Ch 8. Skip remaining 34 sts. Sl st to join. You now have front and back panels connected by chain bridges.
Round 32: Ch 1, sc in each st and each ch around. Sl st to join. (84 sts: 34 front + 8 ch + 34 back + 8 ch)
Rounds 33–56: Ch 1, sc in each st around. Sl st to join. (84 sts)
Part 4: Waist Shaping
Round 57 (decrease): Ch 1, (sc in next 12 sts, sc2tog) around. Sl st to join. (78 sts)
Rounds 58–62: Ch 1, sc in each st around. (78 sts)
Round 63 (decrease): Ch 1, (sc in next 11 sts, sc2tog) around. Sl st to join. (72 sts)
Rounds 64–70: Ch 1, sc in each st around. (72 sts)
Part 5: Hip and Hem
Round 71 (increase): Ch 1, (sc in next 11 sts, 2 sc in next st) around. (78 sts)
Rounds 72–80: Ch 1, sc in each st around. (78 sts)
Scallop edging (Rnd 81): (Sk 1 st, 5 dc in next st, sk 1 st, sl st in next st) around. Fasten off. This pretty scalloped hem mirrors the sleeve edges.
Part 6: Bell Sleeves (Make 2)
Lace motif (make 8 per sleeve, 16 total): Using the 4.0 mm hook and main color, ch 6 and sl st to the first ch to form a ring.
Rnd 1: ch 3 (counts as dc), 15 dc in ring, sl st to top of ch-3. (16 dc)
Rnd 2: ch 5 (counts as dc + ch 2), (dc in next st, ch 2) around, sl st to 3rd ch of ch-5. (16 dc, 16 ch-2 sps)
Rnd 3: sl st into ch-2 sp. Ch 3, 2 dc in same sp, ch 2, (3 dc in next ch-2 sp, ch 2) around, sl st to top of ch-3. (16 groups of 3 dc)
Rnd 4: ch 1, sc in each dc and 2 sc in each ch-2 sp around, sl st to join. (64 sts) Fasten off, leaving a 12-inch tail for sewing.
Assemble: Arrange 8 motifs in two rows of 4 and whip stitch them together, matching stitch for stitch, then sew the side edges into a tube. Join main color at the top edge of the tube.
Rnd 1: ch 1, sc evenly around the top opening (approximately 60 sc), sl st to join.
Rnds 2–10: ch 1, sc in each st around, decreasing 4 sts evenly each round until the opening measures about 10–11 inches around (approximately 24 sts). Place the sleeve into the armhole opening and whip stitch the cap to the armhole edge, easing to fit. For the cuff, join main color at the bottom of the sleeve and work the same scallop edging as the bodice hem. Repeat for the second sleeve.
Part 7: Shoulder Straps (Make 2)
Using the 3.5 mm hook and main color, ch 80 (or your desired length from neckband front to neckband back).
Row 1: sc in 2nd ch from hook and each ch across. Fasten off. Sew the straps to the inside of the neckband, about 3 inches from center front and center back.
Part 8: Rose Appliqués
Large rose (make 3 in deep purple, 2 in mauve): Using the 3.5 mm hook, ch 40.
Row 1: dc in 4th ch from hook, (sk 1 ch, 3 dc in next ch) across (approximately 19 shells). Fasten off with an 18-inch tail. Roll the strip from the starting end, coiling tightly at first then loosening slightly, and secure with the tail, stitching through all layers at the base.
Small rose (make 2 in mauve, 1 in deep purple): Using the 3.5 mm hook, ch 28 and work the same row. Roll and secure the same way.
Leaves (make 8 in sage green): Ch 10.
Row 1: sc in 2nd ch, hdc in next ch, dc in next 3 ch, hdc in next ch, sc in next ch, sl st in next ch. Working along the opposite side: sl st, sc, hdc, dc 3, hdc, sc in the last ch. Sl st to first sc. Fasten off.
Arrange the roses cascading diagonally from the right shoulder down across the front to the left hip — start with two larger roses near the shoulder, fill in with medium and small roses, and tuck leaves behind and around them. Sew each rose through the base only, and secure leaves along their center lines so the edges curl naturally.
Sophie’s Tips
- Make the roses first — they’re quick little wins that build confidence before the garment marathon.
- Try the bodice on right after the armhole division to check your fit while it’s easy to adjust.
- Place a marker every 20 stitches on the bodice; catching a miscount early saves real tears.
Slip it on, do one twirl, and enjoy every single compliment.