# Sunset Starfish Baby Wrap Free Crochet Pattern
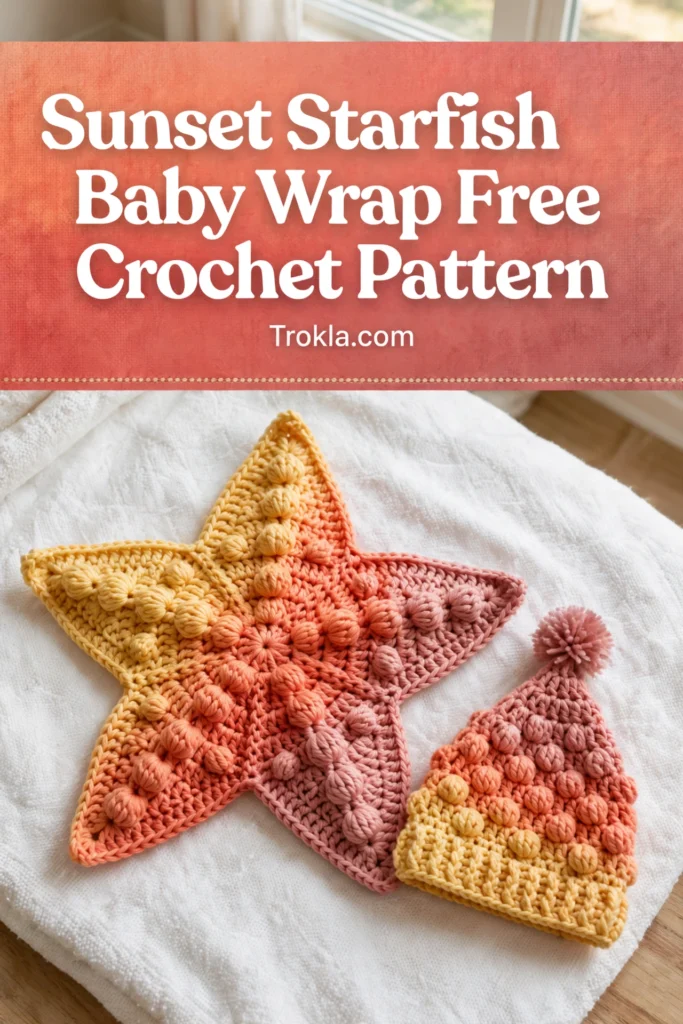
I call this one my “Little Sea Star,” and oh my goodness, the photos. This starfish-shaped wrap cocoon cradles a newborn in the sweetest little sea creature silhouette, complete with a sunset ombre that fades from buttery yellow through coral to dusty rose. Those raised dots scattered across the surface? Those are bobble stitches — they mimic the little bumps on a real starfish, and they catch the light beautifully in pictures.
This is a flat star-shaped wrap with a center opening where the baby nestles in, front panels that wrap around and button closed with three wooden buttons, and a matching pointed hat with a tiny pom-pom. It doubles as a photography prop and a genuinely cozy snuggle sack. Fair warning: grandparents may cry when they see the finished photos. Mine did.

What You’ll Need
- Worsted weight yarn (category 4), approximately 600 yards (550 m) total — smooth yarns only, so the bobbles show:
- Color A (yellow): approximately 150 yards
- Color B (coral/salmon): approximately 200 yards
- Color C (dusty rose/mauve): approximately 250 yards
- US J-10 (6.0 mm) crochet hook
- Yarn needle
- 3 wooden buttons, approximately 3/4 inch (19 mm) diameter
- Sewing needle and matching thread for the buttons
- Stitch markers, scissors, rust-proof pins for blocking
- Small pom-pom maker or cardboard circles (about 1 inch finished pom-pom)
Finished size:
- Wrap approximately 22 inches wide point-to-point and 22 inches tall
- Central baby pocket opening approximately 9 inches wide and 8 inches tall
- Hat approximately 12.5 inch circumference — fits newborn to 3 months
Gauge:
- in half double crochet with the J-10 hook, 14 stitches = 4 inches and 10 rows = 4 inches. Gauge really matters here — too small and the wrap won’t enclose the baby, too big and it looks sloppy in photos. Take time to swatch

The Pattern
Special Stitches
Bobble (bob): Yarn over, insert hook into the indicated stitch, yarn over and pull up a loop, yarn over and draw through the first 2 loops (1 incomplete dc, 2 loops on hook). Repeat this 3 more times in the same stitch (5 loops on hook). Yarn over and draw through all 5 loops, then ch 1 to close and lock the bobble. The closing chain does not count as a stitch. Work bobbles on wrong-side rows so they pop to the right side.
hdc2tog: Yarn over, insert hook in next st, pull up a loop (3 loops), yarn over, insert hook in following st, pull up a loop (5 loops), yarn over and draw through all 5 loops.
hdc2inc: Work 2 hdc in the same stitch.
Pattern notes: The turning ch 2 at the start of each hdc row does NOT count as a stitch — always work your first hdc into the first stitch of the row. Change colors at the end of the last stitch of the indicated row: work until 2 loops remain, draw the new color through, then turn. Bobbles appear every 5th stitch on wrong-side rows, offset a few stitches on alternating bobble rows for that organic, irregular starfish dot pattern.
Part 1: Back Star Panel
Worked as a single flat piece from the bottom point upward.
Lower point (bottom arm) — begin with Color C:
Row 1 (RS): Ch 3. Work 2 hdc in 3rd ch from hook. Turn. (2 sts)
Row 2 (WS): Ch 2, hdc2inc in first st, hdc in next st, hdc2inc in last st. Turn. (4 sts)
Row 3 (RS): Ch 2, hdc2inc in first st, hdc across to last st, hdc2inc in last st. Turn. (6 sts)
Row 4 (WS): Ch 2, hdc2inc in first st, hdc in next 2 sts, bob in next st, hdc in next st, hdc2inc in last st. Turn. (8 sts)
Row 5 (RS): Ch 2, hdc2inc in first st, hdc across to last st, hdc2inc in last st. Turn. (10 sts)
Row 6 (WS): Ch 2, hdc2inc in first st, hdc in next 3 sts, bob in next st, hdc in next 3 sts, hdc2inc in last st. Turn. (12 sts)
Row 7 (RS): Ch 2, hdc2inc in first st, hdc across to last st, hdc2inc in last st. Turn. (14 sts)
Row 8 (WS): Ch 2, hdc2inc in first st, hdc in next 2 sts, bob in next st, hdc in next 5 sts, bob in next st, hdc in next 2 sts, hdc2inc in last st. Turn. (16 sts)
Row 9 (RS): Ch 2, hdc2inc in first st, hdc across to last st, hdc2inc in last st. Turn. (18 sts)
Row 10 (WS): Ch 2, hdc2inc in first st, hdc in next 4 sts, bob in next st, hdc in next 5 sts, bob in next st, hdc in next 4 sts, hdc2inc in last st. Turn. (20 sts)
Checkpoint: your bottom point triangle should measure about 3.5 inches wide and 4 inches tall. Way off? Check your gauge.
Lower body expansion (still Color C):
Row 11 (RS): Ch 2, hdc2inc in first st, hdc across to last st, hdc2inc in last st. Turn. (22 sts)
Row 12 (WS): Ch 2, hdc2inc in first st, hdc in 4 sts, bob, hdc in 5 sts, bob, hdc in 5 sts, bob, hdc in 4 sts, hdc2inc in last st. Turn. (24 sts)
Row 13 (RS): Ch 2, hdc2inc in first st, hdc across to last st, hdc2inc in last st. Turn. (26 sts)
Row 14 (WS): Ch 2, hdc2inc in first st, hdc in 3 sts, bob, (hdc in 5 sts, bob) 3 times, hdc in 3 sts, hdc2inc in last st. Turn. (28 sts)
Row 15 (RS): Ch 2, hdc2inc in first st, hdc across to last st, hdc2inc in last st. Turn. (30 sts)
Row 16 (WS): Ch 2, hdc across. Turn. (30 sts) Change to Color B at the end of this row.
Rows 17–20 (Color B):
Row 17 (RS): Ch 2, hdc2inc in first st, hdc across to last st, hdc2inc in last st. Turn. (32 sts)
Row 18 (WS): Ch 2, hdc in 3 sts, bob, (hdc in 5 sts, bob) 4 times, hdc in 3 sts. Turn. (32 sts)
Row 19 (RS): Ch 2, hdc2inc in first st, hdc across to last st, hdc2inc in last st. Turn. (34 sts)
Row 20 (WS): Ch 2, hdc across. Turn. (34 sts)
Lower arm extensions:
Row 21 setup: At the end of Row 20, do not turn. Ch 12 for the right arm extension. Turn.
Row 21 (RS): Ch 2, hdc2inc in 3rd ch from hook, hdc in remaining 10 ch (12 sts right arm), then hdc across all 34 body sts, hdc2inc in last st. Do not turn yet — ch 12 for the left arm extension at the far end. Turn. (60 sts total)
Row 22 (WS): Ch 2, hdc2inc in first st, hdc across all 60 sts, hdc2inc in last st. Turn. (62 sts)
Row 23 (RS): Ch 2, hdc across. Turn. (62 sts)
Row 24 (WS): Ch 2, hdc in 4 sts, bob, (hdc in 5 sts, bob) 8 times, hdc in 3 sts. Turn. (62 sts)
Row 25 (RS): Ch 2, hdc across. Turn. (62 sts)
Lower arm taper (decrease 2 sts every row):
Row 26 (WS): Ch 2, hdc2tog, hdc across to last 2 sts, hdc2tog. Turn. (60 sts)
Row 27 (RS): Ch 2, hdc2tog, hdc across to last 2 sts, hdc2tog. Turn. (58 sts)
Row 28 (WS): Ch 2, hdc2tog, hdc in 3 sts, bob, (hdc in 5 sts, bob) 6 times, hdc in 3 sts, hdc2tog. Turn. (56 sts)
Row 29 (RS): Ch 2, hdc2tog, hdc across to last 2 sts, hdc2tog. Turn. (54 sts)
Row 30 (WS): Ch 2, hdc2tog, hdc across to last 2 sts, hdc2tog. Turn. (52 sts)
Row 31 (RS): Ch 2, hdc2tog, hdc across to last 2 sts, hdc2tog. Turn. (50 sts)
Row 32 (WS): Ch 2, hdc2tog, hdc in 4 sts, bob, (hdc in 5 sts, bob) 5 times, hdc in 3 sts, hdc2tog. Turn. (48 sts)
Row 33 (RS): Ch 2, hdc2tog, hdc across to last 2 sts, hdc2tog. Turn. (46 sts)
Row 34 (WS): Ch 2, hdc2tog, hdc across to last 2 sts, hdc2tog. Turn. (44 sts)
Row 35 (RS): Ch 2, hdc2tog, hdc across to last 2 sts, hdc2tog. Turn. (42 sts)
Row 36 (WS): Ch 2, hdc2tog, hdc in 3 sts, bob, (hdc in 5 sts, bob) 4 times, hdc in 4 sts, hdc2tog. Turn. (40 sts)
Row 37 (RS): Ch 2, hdc2tog, hdc across to last 2 sts, hdc2tog. Turn. (38 sts)
Top point (blend from B to A over Rows 38–41, then continue in A):
Rows 38–49: Continue decreasing 2 sts every row — Ch 2, hdc2tog, hdc across to last 2 sts, hdc2tog. Turn. On WS rows (38, 40, 42, 44, 46, 48), work bobbles spaced about every 5th stitch, offset from the previous bobble row. (36, 34, 32, 30, 28, 26, 24, 22, 20, 18, 16, 14 sts)
Row 50 (WS): Ch 2, hdc2tog, hdc in 2 sts, bob, hdc in 4 sts, bob, hdc in 2 sts, hdc2tog. Turn. (12 sts)
Row 51 (RS): Ch 2, hdc2tog across. Turn. (6 sts)
Fasten off, thread the tail through the remaining stitches, and pull closed.
Part 2: Front Wrap Flaps (Make 2)
These wrap over the baby and button closed. Work one plain flap and one with buttonholes, both in Color B.
Plain flap: Ch 32.
Row 1: hdc in 3rd ch from hook and across (30 sts).
Rows 2–20: ch 2, hdc across (30 sts). Fasten off.
Buttonhole flap: Work the same, but on
Row 18: ch 2, hdc in first 6 sts, (ch 2, sk 2 sts, hdc in next 8 sts) 3 times, hdc in last 2 sts.
Row 19: ch 2, hdc across, working 2 hdc in each ch-2 space (30 sts).
Row 20: ch 2, hdc across (30 sts). Fasten off.
Part 3: Hat (Color A)
Rnd 1: Magic ring, 8 hdc into ring, join. (8 sts)
Rnd 2: Ch 2, hdc2inc in each st around, join. (16 sts)
Rnd 3: Ch 2, (hdc, hdc2inc) around, join. (24 sts)
Rnd 4: Ch 2, (2 hdc, hdc2inc) around, join. (32 sts)
Rnd 5: Ch 2, (3 hdc, hdc2inc) around, join. (40 sts)
Rnd 6: Ch 2, (9 hdc, hdc2inc) 4 times, join. (44 sts)
Rnds 7–16: Ch 2, hdc in each st around, join. (44 sts)
Rnd 17: Ch 2, (9 hdc, hdc2tog) 4 times, join. (40 sts)
Rnds 18–19: Ch 2, hdc in each st around, join. (40 sts)
Rnd 20: Ch 2, (8 hdc, hdc2tog) 4 times, join. (36 sts)
Rnd 21: Ch 2, hdc in each st around, join. (36 sts)
Rnd 22: Ch 2, (4 hdc, hdc2tog) 6 times, join. (30 sts)
Rnd 23: Ch 2, (3 hdc, hdc2tog) 6 times, join. (24 sts)
Rnd 24: Ch 2, (2 hdc, hdc2tog) 6 times, join. (18 sts)
Rnd 25: Ch 2, (hdc, hdc2tog) 6 times, join. (12 sts)
Rnd 26: Ch 2, hdc2tog 6 times, join. (6 sts)
Fasten off and weave in the end. Make a small pom-pom and sew it firmly to the tip.
Assembly
Block all pieces lightly. Sew the plain flap to one side edge of the body and the buttonhole flap to the other, aligning them over the center opening. Sew the three wooden buttons to the plain flap where the buttonholes fall. Weave in every end — newborn skin is sensitive, so tuck them in well.
Sophie’s Tips
- Work every bobble on a wrong-side row and they’ll pop perfectly to the front — the whole texture depends on this one habit.
- Change colors at the end of the row, not the beginning, for the cleanest ombre transitions.
- Swatch and block your swatch. Newborn fit is unforgiving, and ten minutes now saves a wrap that doesn’t wrap.
Happy crocheting — and somebody warn the grandparents about the photos.