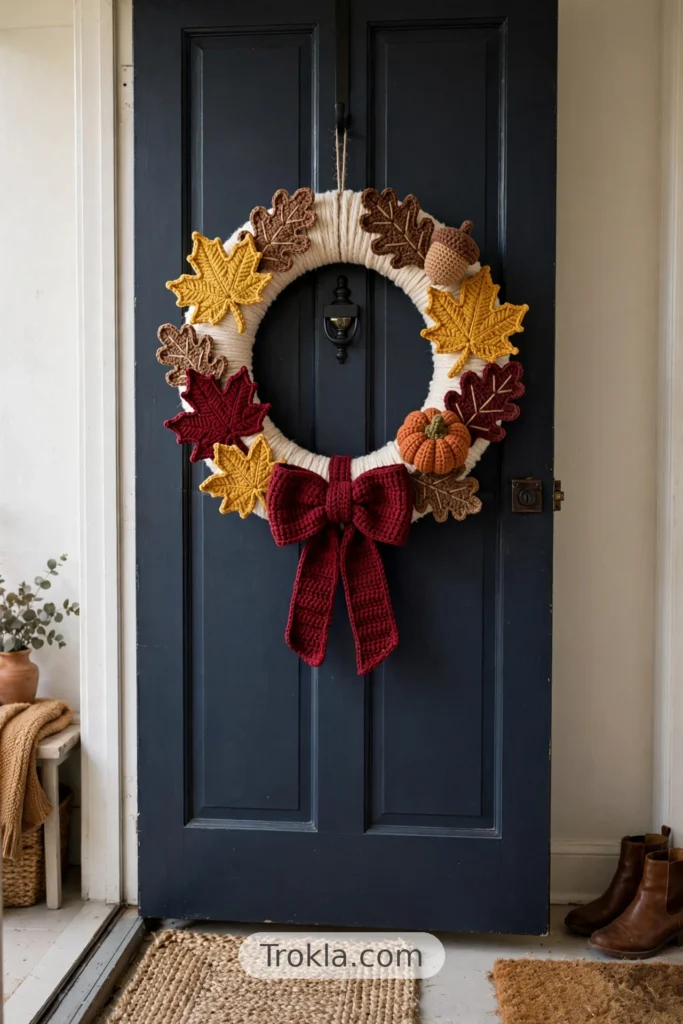
# Mornings of Autumn Crochet Wreath Free Pattern

Happy fall, y’all! My front door is never complete without a wreath — and since I love crochet almost as much as I love wreaths, smushing the two together was a no-brainer. Add my third love (pumpkins, obviously) and you get the Mornings of Autumn Wreath: a cozy 12-inch wreath covered in cream yarn and dressed up with maple leaves, oak leaves, a chubby little acorn, a tiny pumpkin, and the sweetest wine-colored bow.
My favorite thing about this project is the color palette — cranberry, mustard, terracotta, fern green — it’s like the best part of an October morning, right on your front door. Let’s make one!
What You’ll Need
- Lion Brand Vanna’s Choice yarn (or any worsted weight):
- Cranberry — 1 skein
- Wine — 1 skein
- Fern — 1 skein
- Toffee — 1 skein
- Mustard — 1 skein
- Terracotta — 1 skein
- Beige — 2 skeins (one for the wreath base, one mostly for the acorn)
- Size H (5 mm) crochet hook
- Size G (4.5 mm) crochet hook
- Tapestry needle
- Polyfil stuffing
- 12-inch foam wreath form
The Wreath Base
Wrap your foam form in beige yarn first. The easiest way: crochet a long beige strip in single crochet — chain enough to circle the form with overlap, then work rows until the strip is wide enough to wrap all the way around the foam. Wrap it snugly around the form and whipstitch the long edges together on the back, tucking as you go. One skein of beige is plenty for the base.
The Embellishments
Work all leaves in the back loop only unless a row says otherwise.
Large Maple Leaf (make 1 in mustard, 1 in cranberry)
With the H (5 mm) hook, chain 13. Sc in the 2nd chain from the hook and across. Chain 2, don’t turn — keep working back up the other side of the chain, sc in the next 10 stitches (not all the way back up). Chain 1, turn.
Row 2: Sc in the next 10 sts, work (sc, ch 2, sc) in the ch-2 space at the bottom, coming back up the other side sc in the next 10 sts. Ch 1, turn.
Row 3: Sc in the next 11 sts, (sc, ch 2, sc) in the ch-2 space at the bottom, coming back up the other side sc in the next 8 sts. Ch 1, turn.
Row 4: Sc in the next 9 sts, (sc, ch 3, sc) in the ch-2 space at the bottom, coming back up the other side sc in the next 9 sts. Ch 1, turn.
Row 5: Sc in the next 5, slip stitch in the next stitch. Ch 1, turn.
Row 6: Sc in the back loop of the slip stitch, sc in the next 2. Ch 3, turn.
Row 7: Skip the first chain, sc in the next 2 chains, sc in the next 3, slip stitch in the next stitch of Row 4. Ch 1, turn.
Row 8: Sc in the back loop of the slip stitch, sc in the next 5. Ch 3, turn.
Row 9: Skip the first chain, sc in the next 2 chains, sc in the next 6, slip stitch in the next stitch of Row 4. Ch 1, turn.
Row 10: Sc in the back loop of the slip stitch, sc in the next 6. Ch 1, turn.
Row 11: Sc in the next 7, slip stitch in the next stitch of Row 4. Ch 1, turn.
Row 12: Sc in the back loop of the slip stitch, sc in the next 4. Ch 3, turn.
Row 13: Skip the first chain, sc in the next 2 chains, sc in the next 5, slip stitch in the next stitch of Row 4. Ch 1, turn.
Row 14: Sc in the back loop of the slip stitch, sc in the next 4. Ch 1, turn.
Row 15: Sc in the next 5, work 2 sc in the ch-3 space at the bottom, do not turn — continuing up the other side of Row 4, sc in the next 7. Ch 3, turn.
Row 16: Skip the first chain, sc in the next 2 chains, sc in the next 3, slip stitch in the next stitch of Row 4. Ch 1, turn.
Row 17: Sc in the back loop of the slip stitch, sc in the next 5. Ch 3, turn.
Row 18: Skip the first chain, sc in the next 2 chains, sc in the next 6, slip stitch in the next stitch of Row 4. Ch 1, turn.
Row 19: Sc in the back loop of the slip stitch, sc in the next 6. Ch 1, turn.
Row 20: Sc in the next 7, slip stitch in the next stitch of Row 4. Ch 1, turn.
Row 21: Sc in the back loop of the slip stitch, sc in the next 4. Ch 3, turn.
Row 22: Skip the first chain, sc in the next 2 chains, sc in the next 5, slip stitch in the next stitch of Row 4. Ch 1, turn.
Row 23: Sc in the back loop of the slip stitch, sc in the next 4. Ch 1, turn.
Row 24: Working across the bottom of the whole leaf: sc in the next 5, slip stitch in the next 2, sc in the next 3. Ch 1, turn.
Row 25: Sc in the next 3, slip stitch in the next 2, sc in the next 3. Ch 1, turn.
Row 26: Sc in the next 3, slip stitch into the next stitch. Chain 6, sc in the 2nd chain from the hook and in the next 4 chains, slip stitch in the next stitch, slip stitch in the next 3. Fasten off, leaving a long tail for sewing to the wreath.
Small Maple Leaf (make 1 in fern)
With the G (4.5 mm) hook, chain 11. Sc in the 2nd chain from the hook and across. Chain 2, don’t turn — keep working back up the other side of the chain, sc in the next 8 stitches (not all the way back up). Chain 1, turn.
Row 2: Sc in the next 8 sts, (sc, ch 2, sc) in the ch-2 space at the bottom, coming back up the other side sc in the next 8 sts. Ch 1, turn.
Row 3: Sc in the next 9 sts, (sc, ch 2, sc) in the ch-2 space at the bottom, coming back up the other side sc in the next 6 sts. Ch 1, turn.
Row 4: Sc in the next 7 sts, (sc, ch 3, sc) in the ch-2 space at the bottom, coming back up the other side sc in the next 7 sts. Ch 1, turn.
Row 5: Sc in the next 4, slip stitch in the next stitch. Ch 1, turn.
Row 6: Sc in the back loop of the slip stitch, sc in the next 2. Ch 3, turn.
Row 7: Skip the first chain, sc in the next 2 chains, sc in the next 3, slip stitch in the next stitch of Row 4. Ch 1, turn.
Row 8: Sc in the back loop of the slip stitch, sc in the next 5. Ch 3, turn.
Row 9: Skip the first chain, sc in the next 2 chains, sc in the next 6, slip stitch in the next stitch of Row 4. Ch 1, turn.
Row 10: Sc in the back loop of the slip stitch, sc in the next 6. Ch 1, turn.
Row 11: Sc in the next 7, work 2 sc in the ch-3 space at the bottom, do not turn — continuing up the other side of Row 4, sc in the next 7. Ch 3, turn.
Row 12: Skip the first chain, sc in the next 2 chains, sc in the next 3, slip stitch in the next stitch of Row 4. Ch 1, turn.
Row 13: Sc in the back loop of the slip stitch, sc in the next 5. Ch 3, turn.
Row 14: Skip the first chain, sc in the next 2 chains, sc in the next 6, slip stitch in the next stitch of Row 4. Ch 1, turn.
Row 15: Sc in the back loop of the slip stitch, sc in the next 6. Ch 1, turn.
Row 16: Sc in the next 7, slip stitch in the next stitch of Row 4. Ch 1, turn.
Row 17: Sc in the back loop of the slip stitch, sc in the next 4. Ch 3, turn.
Row 18: Skip the first chain, sc in the next 2 chains, sc in the next 5, slip stitch in the next stitch of Row 4. Ch 1, turn.
Row 19: Working across the bottom of the whole leaf: sc in the next 5, slip stitch in the next 2, sc in the next 3. Ch 1, turn.
Row 20: Sc in the next 3, slip stitch in the next 2, sc in the next 3. Ch 1, turn.
Row 21: Sc in the next 3, slip stitch into the next stitch. Chain 6, sc in the 2nd chain from the hook and in the next 4 chains, slip stitch in the next stitch, slip stitch in the next 3. Fasten off, leaving a long tail for sewing.
Also make one extra large maple leaf in Terracotta for a pop of orange — the more leaves, the merrier!
Large Oak Leaf (make 1 in toffee)
With the H (5 mm) hook, chain 20. Sc in the 2nd chain from the hook and in the next 3 stitches, hdc in the next 4, dc in the next 5, trc in the next 5, work 6 dc in the last stitch. Turn to work down the other side of the chain: trc in the next 5, dc in the next 5, hdc in the next 4, sc in the next 4, slip stitch in the last stitch.
Round 2: Hdc in the 1st stitch, skip 1, work (3 dc, ch 3, slip stitch) in the next stitch, skip 1, slip stitch, sc, hdc, dc, work (3 trc, ch 4, slip stitch) in the next stitch, skip 1, slip stitch, sc, hdc, 3 dc, work (3 trc, ch 4, slip stitch) in the next stitch, skip 1, slip stitch, work (hdc, dc, trc) in the next stitch.
Repeat Round 2 in reverse back down the other side. Slip stitch to join. Fasten off, leaving a long tail for sewing.
Small Oak Leaf (make 1 in mustard, 1 in fern)
With the H (5 mm) hook, chain 15. Sc in the 2nd chain from the hook and in the next 2 stitches, hdc in the next 3, dc in the next 4, trc in the next 3, work (trc, 6 dc, trc) in the last stitch. Turn to work down the other side of the chain: trc in the next 3, dc in the next 4, hdc in the next 3, sc in the next 3, slip stitch in the last stitch.
Round 2: Hdc in the 1st stitch, skip 1, work (3 dc, ch 3, slip stitch) in the next stitch, skip 1, slip stitch, sc, hdc, dc, work (3 trc, ch 4, slip stitch) in the next stitch, skip 1, slip stitch, sc, hdc, dc, work (3 trc, ch 4, slip stitch) in the next stitch, skip 1, slip stitch, sc, work (hdc, dc, trc) in the next stitch.
Repeat Round 2 in reverse back down the other side. Slip stitch to join. Fasten off, leaving a long tail for sewing.
Acorn
Don’t join rounds — place a stitch marker in the first stitch of each round and move it up as you go.
With beige yarn, make a magic ring and work 6 sc into the ring.
Round 2: Work 2 sc in each stitch around. (12)
Round 3: *2 sc in the next stitch, sc in the next 5* — repeat around. (14)
Round 4: *2 sc in the next stitch, sc in the next 2* — repeat around. (18)
Rounds 5–10: Sc in each stitch around. (18)
Round 11: *Sc decrease, sc in the next stitch* — repeat around. Fasten off.
Cap: With toffee yarn, make a magic ring (leave a tail about 2 feet long) and work 6 sc into the ring.
Round 2: Work 2 sc in each stitch around. (12)
Round 3: *2 sc in the next stitch, sc in the next stitch* — repeat around. (18)
Round 4: *2 sc in the next stitch, sc in the next 3* — repeat around, then sc in the next 2. (24)
Round 5: Sc in each stitch around. (24)
Round 6: *Sc decrease, sc in the next 9* — repeat around. Fasten off, leaving a long tail for sewing.
Pick up the magic-ring tail through the center of the ring, chain 6 with it, sc in the 2nd chain from the hook and across, then weave the end back into the top of the acorn. Place the brown cap on the beige acorn and sew it into place. Stuff the acorn lightly before closing if you like it plump.

Mini Pumpkin
Don’t join rounds — move your stitch marker up each round.
With the G (4.5 mm) hook and terracotta yarn, make a magic ring and work 6 sc into the ring.
Round 2: Work 2 sc in each stitch around. (12)
Round 3: *2 sc, sc in the next stitch* — repeat around. (18)
Round 4: *2 sc, sc in the next 2* — repeat around. (24)
Round 5: *2 sc, sc in the next 3* — repeat around. (30)
Round 6: *2 sc, sc in the next 4* — repeat around. (36)
Round 7: *2 sc, sc in the next 5* — repeat around. (42)
Rounds 8–14: Sc in each stitch around. (42)
Round 15: *Sc decrease, sc in the next 5* — repeat around. (36)
Round 16: *Sc decrease, sc in the next 4* — repeat around. (30)
Round 17: *Sc decrease, sc in the next 3* — repeat around. (24)
Round 18: *Sc decrease, sc in the next 2* — repeat around. (18)
Round 19: *Sc decrease, sc in the next stitch* — repeat around. (12)
Round 20: Sc decrease 6 times. (6) Fasten off, leaving a tail about 3 feet long.
Stuff the pumpkin, then thread the tapestry needle with the long tail, insert it into the magic ring and down out through Round 20, and pull tight to create a seam. Repeat four more times to make five seams total — this gives you those classic pumpkin ridges.
Stem: With toffee yarn, make a magic ring and work 5 sc into the ring. Rounds 2–3: Sc in each stitch around. Fasten off, leaving a long tail, and sew the stem onto the top of the pumpkin.
Bow
With the H (5 mm) hook and wine yarn, chain 13. Sc in the 2nd chain from the hook and each chain across. Chain 1, turn.
Rows 2–53: Sc in each stitch across. Chain 1, turn.
Row 54: Sc in each stitch across.
Row 55: Sc Row 54 to Row 1, holding the ends together to form a loop (just like seaming the wreath cover). Don’t fasten off yet!
Flatten the loop with the seam at the back, cinch the center of the bow into place, and wrap the working yarn around the center roughly 30 times (careful not to pull out your seam stitches!). Fasten off and weave in the ends.
Bow tails (make 2): Chain 5, sc in the 2nd chain from the hook and across. Chain 1, turn. Rows 2–19: Sc in each stitch across, chain 1, turn. Row 20: Sc in each stitch across. Fasten off, leaving a *very* long tail for sewing.
Sew each tail to the back of the bow, then sew the whole bow to the center-bottom of your wreath, weaving the tails back and forth at least three times to really secure it.
Hanger
With beige yarn, chain 9. Sc in the 2nd chain from the hook and across. Fasten off, leaving a long tail. Sew this little strip to the top center of your wreath for hanging, and weave in the ends.
Assembling the Wreath
Play with your layout first — cluster the maple and oak leaves around one side, nestle the acorn and pumpkin among them, and let the bow anchor the bottom center. Sew everything down with those long tails you saved. Hang it on your door with a sturdy hook, step back, and enjoy your little bit of autumn!
Sophie’s Tips
- Weave in ends as you finish each piece — future you will be so grateful.
- If a leaf curls, give it a quick steam and press it flat under a book overnight.
- No foam form handy? A straw wreath form from the craft store works just as well.
Happy fall, and happy hooking! 🍂