# Blushing Peach Blossom Diary Cover Free Crochet Pattern
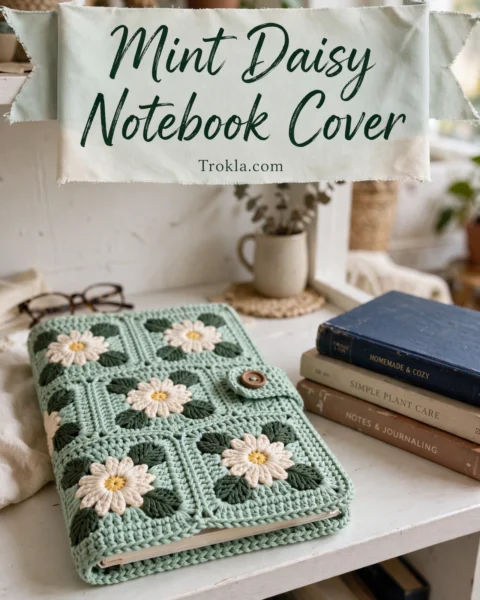
Oh, this one is a gift-giver’s dream! I am convinced that a beautiful journal makes you want to actually write in it, and this peach blossom diary cover turns any plain notebook into something that looks like it came from a boutique gift shop. Soft peach fabric, dainty pink daisies, and those sweet embroidered stems — it is pure charm.
The best part? If you can single crochet, you can absolutely make this. The fancy bits are just simple chain loops and a couple of easy embroidery stitches. You are really just making two flat rectangles, seaming them together, and adding flowers on top. No tricky shaping, no midnight frogging. Grab your prettiest cotton yarn and let’s make something lovely together.

What You’ll Need
- Main color: peach or apricot cotton yarn, DK or light worsted weight, approximately 200 yards (183 m)
- Dusty mauve or antique rose cotton yarn, approximately 60 yards (55 m)
- Soft pink cotton yarn, approximately 40 yards (37 m), for the daisy appliques
- Medium sage green cotton yarn, approximately 20 yards (18 m), for stems and leaves
- US size D-3 (3.25 mm) crochet hook for the panels and spine strip
- US size C-2 (2.75 mm) crochet hook for the flower appliques
- Tapestry needle
- One 0.75 inch (18 mm) magnetic snap, or one decorative 0.75 inch shank button
- Stitch markers, straight pins, and scissors
- An A5 notebook to check the fit (approximately 5.8 x 8.3 inches / 14.8 x 21 cm)
Finished size:
- Closed cover approximately 6.25 inches wide x 8.5 inches tall (16 x 21.5 cm)
- Opened flat approximately 13.5 inches wide x 8.5 inches tall (34 x 21.5 cm)
- Spine border strip approximately 1 inch wide (2.5 cm) running the full height. Fits a standard A5 notebook
The Pattern
Gauge:
- 6 stitches and 7 rows = 1 inch (2.5 cm) in back-loop-only single crochet with the D-3 hook, blocked
- Work a swatch of 20 chains and 15 rows, block it flat, and measure the center
- This cover needs to hug your notebook snugly, so please do not skip this step

All turning chains are ch 1 and do not count as stitches.
Back and Front Panels (make 2)
With the main peach color and the D-3 hook, chain 39.
Row 1 (RS): Sc in 2nd ch from hook and in each ch across. Ch 1, turn. (38 sc)
Row 2: BLO sc in each st across. Ch 1, turn. (38 sc)
Rows 3-60: Repeat Row 2. (38 sc each row)
After Row 60, fasten off and weave in ends. Block both panels; each should measure approximately 6.25 x 8.5 inches after light blocking.
Spine Border Strip
With the dusty mauve and the D-3 hook, chain 9.
Row 1: Sc in 2nd ch from hook and in each ch across. Ch 1, turn. (8 sc)
Row 2: Sc in each st across. Ch 1, turn. (8 sc)
Rows 3-60: Repeat Row 2. (8 sc each row)
Fasten off, leaving a 24-inch tail for sewing.
Button Loop Tab
With the dusty mauve and the D-3 hook, chain 5.
Row 1: Sc in 2nd ch from hook and in each ch across. Ch 1, turn. (4 sc)
Row 2: BLO sc in each st across. Ch 1, turn. (4 sc)
Rows 3-10: Repeat Row 2. (4 sc each row)
Fasten off, leaving a 14-inch tail. Fold the tab in half to form a loop approximately 0.75 inch long and pin the raw ends together.
Seaming the Panels
Place the back panel flat with RS facing up, then lay the front panel on top with RS also facing up. Sandwich the folded button tab between the two panels at the right edge, centered approximately 4.25 inches from the bottom, with the loop facing outward. Pin in place.
Top edge: With mauve yarn and the D-3 hook, begin at the top right corner and work slip stitches through both panels across the top edge. (38 sl sts) Fasten off.
Bottom edge: With mauve, begin at the bottom right corner and work slip stitches through both panels across, securing the tab ends as you pass through that area. (38 sl sts) Fasten off.
Leave the left edge (spine side) and the right edge open.
Attaching the Spine Strip
Position the strip vertically along the left side of the assembled cover front. With mauve threaded on a tapestry needle, whipstitch the right long edge of the strip to the left column of stitches on the front panel, then fold the strip around to the back and whipstitch the left long edge to the back panel. Stitch the short ends neatly closed.
Daisy Appliques (make 18)
You need 18 flowers total: 12 for the front panel (4 clusters of 3) and 6 for the spine strip. Use the pink yarn and the smaller C-2 hook.
Make a magic ring (or ch 4 and sl st to form a ring).
Round 1: Ch 1, work 6 sc into the ring, sl st to the first sc to join. (6 sc)
Round 2: For each petal, ch 6, sl st back into the base sc you just left, then sl st into the next sc. Repeat until all 6 petals are complete. Fasten off, leaving a 10-inch tail for sewing.
Pull the starting tail tight to close the center, and press each flower flat with a damp cloth before sewing.
Placing the Flowers
Front panel clusters: upper left (3 flowers, about 1 inch from the top edge and 0.75 inch from the spine strip), upper right (3 flowers, about 1 inch from the top and 1.5 inches from the right edge), lower right (3 flowers, about 2.5 inches from the bottom), and lower left (3 flowers, about 1.25 inches from the bottom).
Spine strip: space the 6 flowers evenly along the strip, the first about 0.75 inch from the top and the last about 0.75 inch from the bottom.
Pin every flower in position first and step back to check the arrangement. Sew each center firmly with 4 to 6 anchoring stitches using its long tail.
Embroidered Stems and Leaves
With the sage green on a tapestry needle, add the stems and leaves. For each front cluster, bring all three stems down to a single point, then continue one shared stem about 0.75 inch below. Add a lazy daisy leaf pair at the junction and one at the stem base. For the spine flowers, work one straight stem about 0.5 inch below each flower with a lazy daisy leaf pair at the base.
Lazy daisy leaf: bring the needle up at the leaf base, loop the thread, insert the needle back into the same hole, bring the tip out at the leaf tip catching the loop, and tack it down with a small straight stitch.
Attaching the Closure
Magnetic snap: part the yarn fibers at the center right edge of the front panel, about 4.25 inches from the bottom, and push the prongs through to the wrong side; press the washer over them. Repeat for the other half on the back panel.
Button: sew the button to the right edge of the back panel at the same position.
Sophie’s Tips
- Block the finished cover a second time stretched over your closed notebook (slip the notebook into a plastic bag first to protect it from moisture). It molds to a perfect fit, trust me.
- Pin all 18 flowers before sewing a single one. Five minutes of arranging saves an hour of frogging.
- Cotton shows every wobble in your tension, so keep it relaxed and even — the BLO rib will do the pretty work for you.
Go make your prettiest journal yet — and write something lovely in it first!