# Fall Pumpkin Crochet Centerpiece Free Pattern

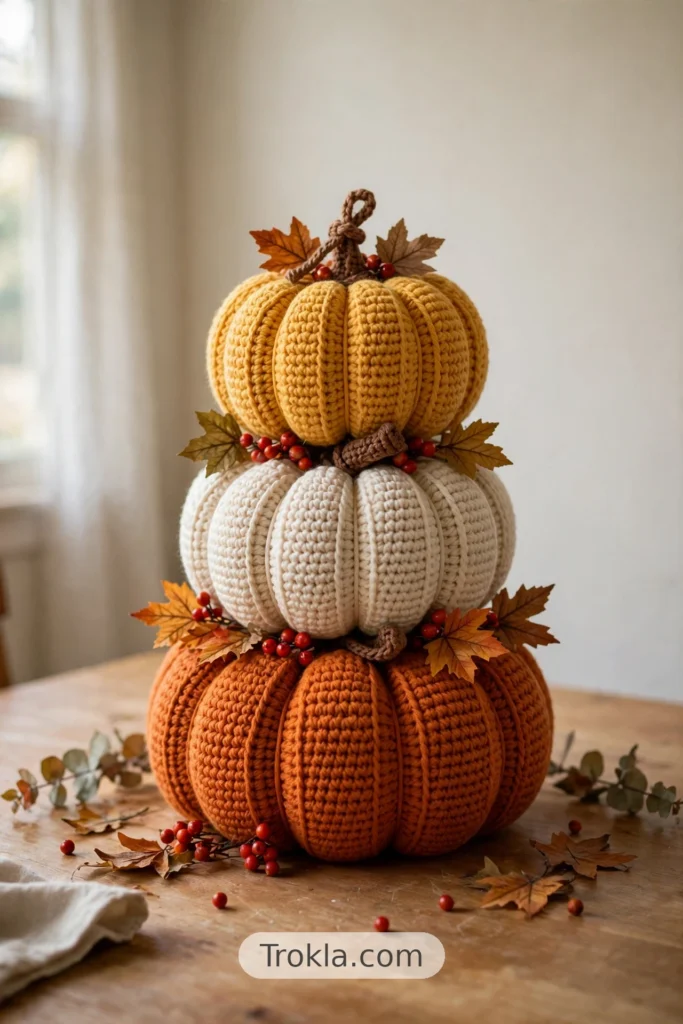
Hi friends! Is there anything cozier than a dining table dressed up for fall? I wanted something special for our Thanksgiving table this year — not a fussy flower arrangement, just something warm and handmade — and this stacked pumpkin centerpiece turned out to be exactly that. Three squishy ribbed pumpkins piled on top of each other, tucked with a few fall leaves and berries, and suddenly my plain wooden table looks straight out of a cozy farmhouse catalog.
The best part? Each pumpkin is just a rectangle! You crochet a flat ribbed piece, gather it up, stuff it, and pop a stem on top. If you can chain and half double crochet, you can absolutely make this.
What You’ll Need
- Worsted weight yarn (I used Red Heart Super Saver):
- 3.7 oz / 193 yds in Carrot — for the large pumpkin
- 2.1 oz / 110 yds in Aran — for the medium pumpkin
- 1 oz / 52 yds in Gold — for the small pumpkin
- 1 yd in Cafe Latte — for the stems
- Size H (5 mm) crochet hook
- Yarn needle
- Scissors
- Polyfil stuffing
- Hot glue (optional)
- Faux floral picks — fall leaves, berries, little flowers, whatever makes you happy
A quick note on yarn: any brand or weight will work here. A bulkier yarn makes chunkier pumpkins, a finer one makes daintier ones — just be sure to use the same weight for all three pumpkins so they stack nicely. And play with color! Classic orange-cream-gold is lovely, but all-white or deep teal pumpkins look stunning too.
Sizes
- Large pumpkin: 9 inches wide and 4.5 inches tall
- Medium pumpkin: 7.5 inches wide and 3.5 inches tall
- Small pumpkin: 5.5 inches wide and 2.5 inches tall
- Finished centerpiece: 9 inches wide and 10.5 inches tall
Gauge:
- 8 HDC x 5 rows = 2 inches
Pattern Notes
- This pattern is written in US terms.
- I don’t count my CH 1 turning chain as a stitch.
- Work a loose CH 1 as your turning chain so your edges stay nice and straight.
- Leave an 18-inch yarn tail at the start of your foundation chain — you’ll use it for sewing and gathering later.
Large Pumpkin
CH 41.
Row 1: Work a HDC in the 2nd CH from the hook. HDC in the next 39 chains. (40 stitches)
Rows 2–54: CH 1, turn, work BLOHDC (back loop only half double crochet) in each stitch across. (40 stitches)
Fasten off, leaving a 24-inch tail for sewing and gathering.
Medium Pumpkin
CH 31.
Row 1: Work a HDC in the 2nd CH from the hook. HDC in the next 29 chains. (30 stitches)
Rows 2–42: CH 1, turn, BLOHDC in each stitch across. (30 stitches)
Fasten off, leaving a 20-inch tail.
Small Pumpkin
CH 21.
Row 1: Work a HDC in the 2nd CH from the hook. HDC in the next 19 chains. (20 stitches)
Rows 2–30: CH 1, turn, BLOHDC in each stitch across. (20 stitches)
Fasten off, leaving an 18-inch tail.
Pumpkin Stem
The stem is worked in continuous rounds — no joining, just keep spiraling.
Row 1: Work 6 SC into a magic circle. (Alternative start: CH 2, then work 6 SC into the 2nd chain from the hook.)
Rows 2–5: SC in each of the 6 stitches.
Fasten off. Don’t weave in the ends — they’ll get tucked into the pumpkin’s center.

Gathering the Pumpkins
Step 1: Sew a gathering stitch along the bottom edge of your rectangle and pull it tight.
Step 2: Make 2 stitches to lock the gather in place.
Step 3: Use a whipstitch to sew the two side edges of the rectangle together.
Step 4: When you reach the top, knot your two yarn tails together to secure everything.
Step 5: Sew a gathering stitch around the top of the pumpkin.
Step 6: Stuff the pumpkin, tuck the stem into the top, and pull the gathering stitch tight to close it up.
Step 7: Knot the two yarn tails together. Make a few stitches to anchor the stem, then knot again.
Step 8: Now pick your finish — cinched or segmented (both below).
Cinched pumpkin: Thread a yarn needle with your yarn tails and run them from the top of the pumpkin straight down through to the bottom. Pull tight, knot, then clip the ends and hide them inside. Done!
Segmented pumpkin (this is the look in my photos): Cut an 18–24 inch piece of yarn. Thread it from the bottom of the pumpkin up through the center to the top, leaving about 6 inches hanging out the bottom. Wrap it around the side of the pumpkin and bring the needle back up through the center. Wrap once more directly across from the first wrap — the two strands will split the pumpkin in half. Pull both ends tight to carve a ridge into the sides, then knot at the bottom. Repeat to make 6 sections on the small and medium pumpkins, and 8 sections on the large pumpkin.
Assembling the Centerpiece
Step 1: Snip or pull the leaves, flowers, and berries off your floral picks (wire cutters help if they have wire centers).
Step 2: Play with the arrangement on top of the large pumpkin — set the medium pumpkin on top now and then to make sure the pieces spread out far enough.
Step 3: Glue or sew the floral pieces in place.
Step 4: Repeat steps 2 and 3 for the medium pumpkin.
Step 5: Stack all three pumpkins — and your centerpiece is complete!
Step 6 (optional): Sew or glue the pumpkins to each other if you like. I left mine unattached so they’re easy to store and rearrange later.
Sophie’s Tips
- That loose turning chain really matters — it keeps your rectangle from puckering at the edges.
- Stuff firmly but not to bursting; you want a plump pumpkin, not a stretched one.
- For a Halloween twist, glue little felt jack-o’-lantern faces onto the front of the pumpkins. Adorable on a porch!
Happy hooking, and I hope your table looks extra cozy this fall! 🧡