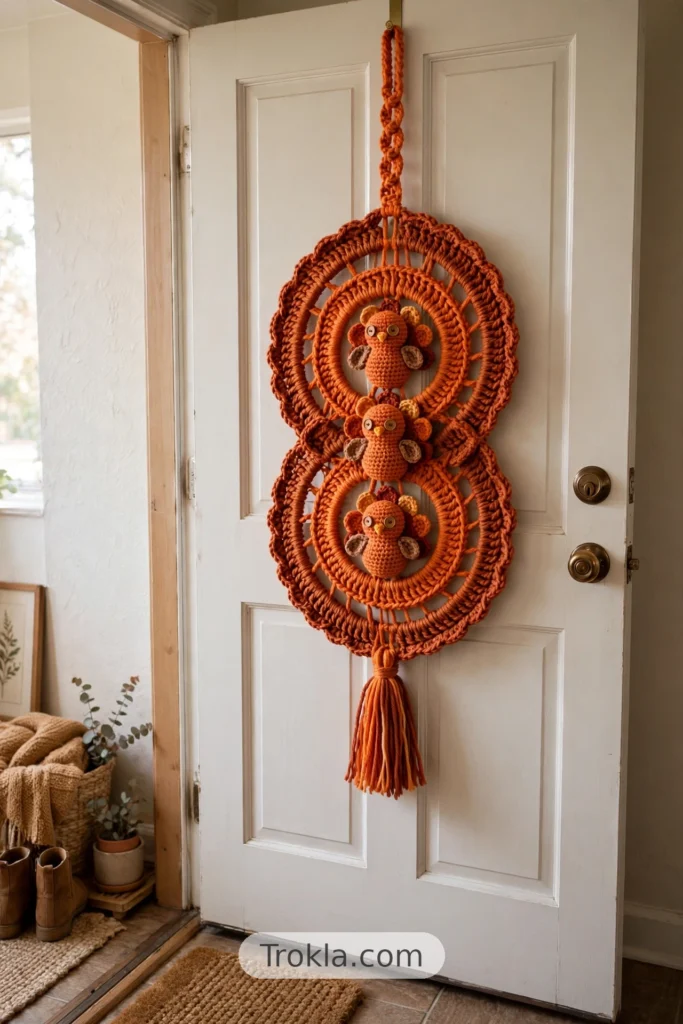
# Crochet Turkey Wallhanging Free Pattern

Gobble gobble! Nothing says Thanksgiving quite like an adorable crochet turkey, and this little guy is ready to strut his stuff on your wall (or your front door — I hang mine like a turkey wreath!). The design is so clever: crocheted rings form the base, a hanging strip weaves through them, and three sweet turkey appliqués with button eyes march right down the middle.
The best part? Gauge is not important here, so you can just relax and enjoy the ride. Grab some scrap yarn in your favorite fall colors and let’s make the cutest turkey wall decor in one cozy evening.
What You’ll Need
- US H (5.0 mm) crochet hook
- Worsted weight yarn — my sample used:
- 1 oz Dark Orange (‘I Love This Yarn’ in Terra Cotta)
- 1-1/4 oz Medium Orange (‘I Love This Yarn’ in Burnt Pumpkin)
- 1 oz Variegated (‘I Love This Yarn’ in Cinnamon Cedar)
- 1 oz Gold (‘Yarn Bee’ in Mustard)
- 1/2 oz Gray-Blue (‘Yarn Bee’ in Viridescent)
- 7 large-mouth canning jar gasket rings (silicone — look for the wide-mouth size, 3.5 inches across from edge to edge)
- Small round shank-type buttons for the eyes (or embroider the eyes with black yarn)
- Tapestry needle and scissors
A note on the rings: silicone canning jar gaskets are easiest to find online, but check your local store’s canning section too. Go for the WIDE-mouth gaskets that fit standard wide-mouth mason jars — the regular size is too small. If your gaskets have little tabs on them, snip them off with scissors so you have a clean, continuous ring to crochet around.
Size & Gauge
- Finished size: approximately 25 inches from the top of the loop to the bottom of the tassel.
- Gauge is not important in this pattern — hooray!
Crochet Abbreviations
- ch = chain
- dc = double crochet
- tr = treble crochet
- sc = single crochet
- sl st = slip stitch
- st = stitch(es)
Crocheted Rings (make 7)
My sample has 4 dark orange rings and 3 medium orange rings — but use whatever fall colors make you happy!
R1: With your main color, work 60 dc into and around the jar ring. Join with a slip stitch to the 1st dc. Fasten off.
R2: Attach gold yarn to any dc and sc all the way around. Fasten off and weave in the ends.
Hanging Strip
With medium orange, chain 90.
R1: Sc in the 10th chain from the hook and in each chain across to the last chain. Slip stitch in the last chain.
R2: Rotate your work. Working along the opposite side of the chain, slip stitch in the 1st chain (the opposite side of the last stitch worked in R1). Sc across to the point where the loop begins, work 10 sc in the loop. Continue working around the opposite side of the strip and sc across the end, ending with a slip stitch in the last stitch at the bottom.
Fasten off and work in all loose ends. Take several strands of yarn (about 10 inches long), fold them in half, and attach them as a tassel at the bottom with a giant slip stitch — the smooth end of the slip stitch should be on the right side of the work. Trim the tassel to a pleasing length.
Turkey Appliqué (make 3)
The turkeys are crocheted in pieces: first the feather base layer, then the little legs, then the body and beak. Sew it all together with button eyes at the end.
Turkey Feather Layer
With variegated yarn, make a magic ring.
R1: Ch 3 and work 11 dc into the ring. Slip stitch to the top of the starting ch-3. (12 st)
R2: Ch 3, dc in the same stitch as the join, work 2 dc in each stitch around. Slip stitch to the top of the starting ch-3. (24 st)
R3: Ch 1, sc in the same stitch as the join, hdc in the next stitch, *2 dc in the next stitch, 1 dc in the next stitch — repeat from * 4 times, hdc in the next stitch, sc in the next stitch. (19 st)
R4: Turn your work. Ch 7, skip the next stitch, sc in the next stitch. Repeat from * around. (9 loops)
R5: Turn your work and work behind the first row of feathers. Ch 7, sc in the skipped stitch from the prior row. Repeat from * 8 times, ch 7, slip stitch to the joining point of the prior row. Fasten off, leaving a long yarn tail for joining.
Turkey Feet
Flip the turkey feathers so the bottom of the bird is at the top. Attach gold yarn with a slip stitch to the 3rd stitch from the end of the feathers on the right side.
*Ch 3 and slip stitch into the 1st chain (toe 1 made), ch 3 and slip stitch into the same chain as toe 1 (toe 2 made), ch 3 and slip stitch into the same chain as toe 1 (toe 3 made).* Skip 1 sc on the body and sc in the next 2 stitches. Repeat from * to ** for the second foot. Skip 1 sc and slip stitch to the next sc. Fasten off.
Turkey Body
With blue-gray yarn, make a magic ring.
R1: Ch 4, work 17 tr into the ring. Slip stitch to the top of the starting ch-4. (18 st)
The next row forms the head:
R2: In the next stitch, work ALL of the following: (slip stitch, ch 2, dc, 5 tr, dc, ch 2, slip stitch). Fasten off.
Turkey Beak
With orange yarn, chain 4. Slip stitch in the 3rd chain from the hook, sc in the last chain. Fasten off.
Putting Each Turkey Together
For each turkey: sew the beak to the head, sew the button eyes onto the head (or embroider them), and sew the body onto the feathers.

Assembling the Wallhanging
Weave the hanging strip over and under the rings — each ring sits on top of the previous one. Start with a dark orange ring and alternate colors, ending with a dark orange ring. Tack the strap down with yarn at the top and bottom of the strip (and anywhere else needed to hold it in place). Don’t worry if it isn’t perfectly centered or pulls a little here and there — you can adjust it at the end so the top loop and the bottom of the strap look even.
Arrange the three turkey appliqués along the strip and sew them down. Finish with the tassel at the bottom, and your turkey wallhanging is ready for Thanksgiving!
Sophie’s Tips
- This project is a fantastic scrap-buster — each ring uses just a small amount of yarn.
- Play with color! Traditional rusts and oranges are classic, but the turkeys look adorable in blues and grays too.
- Make an extra one as a gift — I made one for my son and daughter-in-law and they loved it. 🦃
Happy Thanksgiving crocheting!