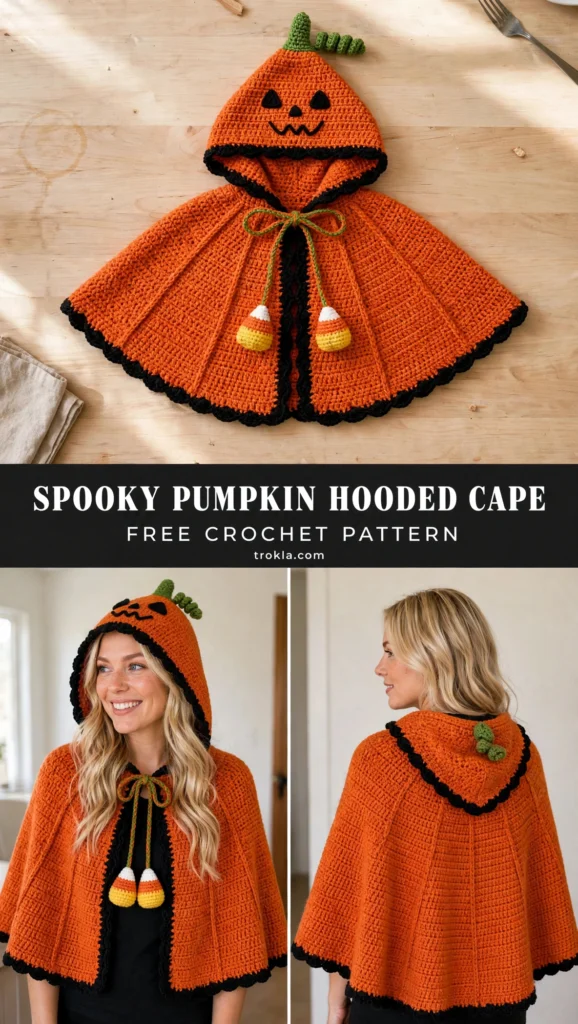
If there’s one thing I look forward to every fall, it’s dreaming up the perfect little Halloween costume. And let me tell you — this spooky pumpkin hooded cape might be the cutest thing I’ve ever made. It’s sized for toddlers (2T to 4T), works up in simple single crochet from the neck down, and finishes with a cone-shaped hood, a curly green stem, and the sweetest little jack-o-lantern face.
The construction is wonderfully straightforward once you get the setup. You start with a flat collar, join it into a tube, then work in continuous rounds, increasing at six evenly spaced points to create that beautiful circular sweep. The hood is a separate cone worked from the tip down and seamed to the neckline. If you can single crochet and follow stitch counts, you’ve got this!
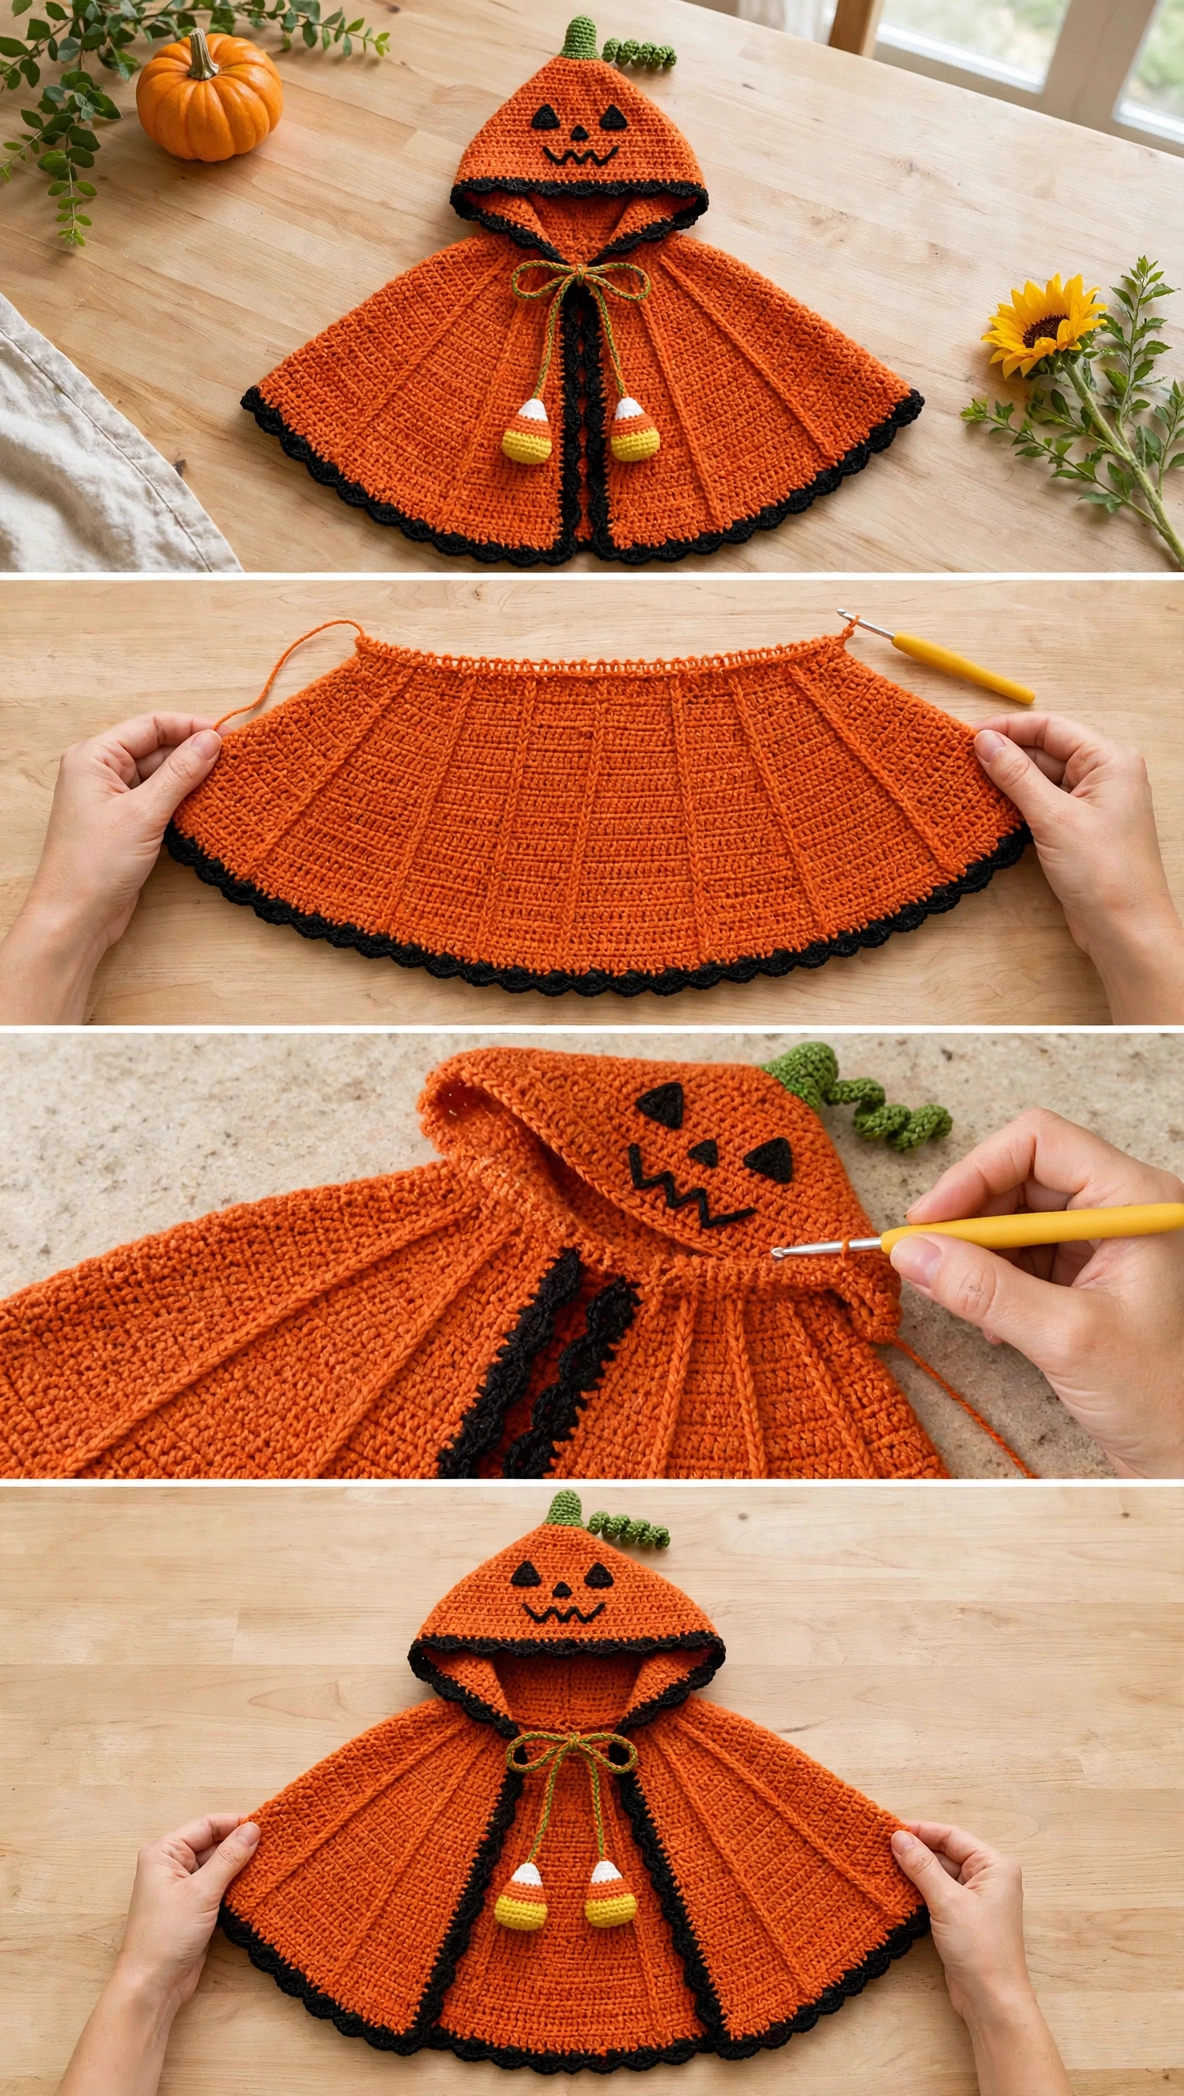
Why You’ll Love This Pumpkin Cape
The clever part is the simplicity. Six increase columns shape the cape into a flat circle, so it drapes beautifully with zero complicated shaping. The hood sits up like a pointed pumpkin top, complete with a crocheted stem and a curling vine tendril.
My favorite details: the black trim along the edges and hem for that classic Halloween contrast, the jack-o-lantern face worked in surface slip stitch so it pops against the orange, and those tiny stuffed candy corn pieces dangling from the tie. Pure charm.
This is an intermediate-level project, but a confident beginner can absolutely make it. You’ll need continuous rounds, basic increasing, seaming, and simple amigurumi techniques for the little embellishments.
Materials You’ll Need
Yarn (all worsted weight, Category 4):
- Yarn A (pumpkin orange): approximately 700 yards / 640 m
- Yarn B (black): approximately 100 yards / 91 m
- Yarn C (green): approximately 60 yards / 55 m
- Yarn D (yellow): approximately 15 yards / 14 m
- Yarn E (white): approximately 10 yards / 9 m
My yarn pick: Lion Brand Pound of Love is wonderful here — machine washable, soft against little skin, and easy to find. Caron Simply Soft gives a slightly softer drape if you prefer that look.
Tools:
- US size J-10 / 6.0 mm crochet hook (cape body and hood)
- US size I-9 / 5.5 mm crochet hook (embellishments)
- Stitch markers (at least 6)
- Yarn needle
- Small amount of fiberfill stuffing
- Scissors
Finished Measurements
Fits size 2T to 4T (approximately ages 2 to 4 years).
- Neck circumference: approximately 10 in / 25.5 cm
- Cape length from neck to hem: approximately 12 in / 30.5 cm
- Hem circumference: approximately 60 in / 152.5 cm
- Hood height: approximately 9 in / 23 cm
- Hood opening: approximately 18 in / 45.5 cm
Gauge
With US J-10 / 6.0 mm hook and Yarn A in single crochet (sc), worked in continuous rounds:
14 sc = 4 in / 10 cm
14 rows = 4 in / 10 cm
Gauge swatch: Chain 18. Work sc across in rows for 18 rows. Block lightly and measure the center 4 in x 4 in section.
Don’t skip the swatch on this one! Even one stitch per inch of difference will change the neck circumference quite a bit.
Abbreviations
- sc = single crochet (insert hook, yarn over, pull up a loop, yarn over, pull through both loops)
- ch = chain (yarn over, pull through loop on hook)
- sl st = slip stitch (insert hook, yarn over, pull through stitch and loop on hook in one motion)
- inc = increase (work 2 sc in the same stitch)
- inv dec = invisible decrease (insert hook into front loop only of next stitch, then front loop only of following stitch, yarn over and pull through both front loops, yarn over and pull through both loops on hook)
- MR = magic ring (make a loop with tail behind working yarn, insert hook through loop, yarn over and pull up a loop, chain 1, then work stitches into the ring)
- ss = surface slip stitch (hold yarn at wrong side, insert hook from front to back through fabric, yarn over and pull up a loop through fabric and through loop on hook)
- st(s) = stitch(es)
- rnd = round
- RS = right side
- WS = wrong side
Special Techniques
Magic Ring (MR)
Makes a tight, closed center for working in the round. Make a loop with the tail end behind the working yarn. Insert your hook through the loop from front to back. Yarn over and pull up a loop, then chain 1 to secure. Work your stitches into the ring, then pull the tail firmly to close the center hole.
Surface Slip Stitch (ss)
Creates raised lines on finished fabric. Hold your yarn at the back of the work. Insert your hook from front to back through a stitch. Yarn over and pull up a loop through the fabric and through the loop on your hook. Keep going along the surface. You’ll use this for the face applique and the trim.
Twisted Cord
Cut 6 strands of Yarn C, each 60 in / 152.5 cm long. Hold all strands together and knot one end. Secure the knotted end to something stable. Twist all strands in one direction until tightly twisted and kinky. Fold in half, hold both ends together, and let the cord twist back on itself. Knot both ends. Finished cord is approximately 14 in / 35.5 cm long.
How to Crochet the Pumpkin Cape
Section 1: Cape Body
The cape begins at the neckline with rows that form a collar, then joins to work in rounds from the neck down.
Foundation and Collar (worked flat)
With Yarn A and J-10 hook, chain 44.
Row 1 (RS): Sc in 2nd ch from hook and in each ch across. Turn. (43 sc)
Rows 2 through 6: Ch 1, sc in each st across. Turn. (43 sc)
At the end of Row 6, do not turn. Fold so the right side faces out and slip stitch the short ends together to form a tube. This creates your neck opening with a gap at center front.
Yoke Setup Round
With RS facing, join Yarn A at center back bottom edge with a slip stitch.
Setup Rnd: Work 43 sc evenly around the bottom edge of the collar tube. Place stitch markers at stitches 1, 8, 15, 22, 29, and 36. These mark your 6 increase columns. (43 sc)
Yoke Increase Rounds
Work in continuous rounds. At each marked stitch, work 2 sc (increase). Work 1 sc in all other stitches.
Rnd 1 (inc rnd): (Sc in each st to marked st, 2 sc in marked st) 6 times, sc in any remaining sts. (49 sc)
Rnd 2: Sc in each st around. (49 sc)
Rnd 3 (inc rnd): (Sc in each st to marked st, 2 sc in marked st) 6 times, sc in any remaining sts. (55 sc)
Rnd 4: Sc in each st around. (55 sc)
Keep alternating one increase round with one plain round — each increase round adds 6 stitches.
Rnd 5: Inc rnd. (61 sc)
Rnd 6: Plain. (61 sc)
Rnd 7: Inc rnd. (67 sc)
Rnd 8: Plain. (67 sc)
Rnd 9: Inc rnd. (73 sc)
Rnd 10: Plain. (73 sc)
Rnd 11: Inc rnd. (79 sc)
Rnd 12: Plain. (79 sc)
Rnd 13: Inc rnd. (85 sc)
Rnd 14: Plain. (85 sc)
Rnd 15: Inc rnd. (91 sc)
Rnd 16: Plain. (91 sc)
Rnd 17: Inc rnd. (97 sc)
Rnd 18: Plain. (97 sc)
Rnd 19: Inc rnd. (103 sc)
Rnd 20: Plain. (103 sc)
Rnd 21: Inc rnd. (109 sc)
Rnd 22: Plain. (109 sc)
Rnd 23: Inc rnd. (115 sc)
Rnd 24: Plain. (115 sc)
Rnd 25: Inc rnd. (121 sc)
Rnd 26: Plain. (121 sc)
Rnd 27: Inc rnd. (127 sc)
Rnd 28: Plain. (127 sc)
Rnd 29: Inc rnd. (133 sc)
Rnd 30: Plain. (133 sc)
Rnd 31: Inc rnd. (139 sc)
Rnd 32: Plain. (139 sc)
Rnd 33: Inc rnd. (145 sc)
Rnd 34: Plain. (145 sc)
Rnd 35: Inc rnd. (151 sc)
Rnd 36: Plain. (151 sc)
Rnd 37: Inc rnd. (157 sc)
Rnd 38: Plain. (157 sc)
Rnd 39: Inc rnd. (163 sc)
Rnd 40: Plain. (163 sc)
Rnd 41: Inc rnd. (169 sc)
Rnd 42: Plain. (169 sc)
Rnd 43: Inc rnd. (175 sc)
Rnd 44: Sc in each st around. (175 sc)
Sl st in next st. Fasten off Yarn A.
Cape Hem Border
Join Yarn B at the left front edge at the hem with a standing sc.
Rnd 1: Sc in each st around entire hem. (175 sc)
Rnd 2 (picot edge): (Sc in next st, ch 3, sl st in first ch of ch-3, sc in next st) repeat around entire hem. Fasten off.
Front Edge Trim
With Yarn B, work surface slip stitches up the right front edge from hem to collar, then down the left front edge. Work 1 surface slip stitch per row end. Fasten off.
Section 2: Hood
The hood is a cone worked from the tip down.
With Yarn A and J-10 hook, make a MR.
Rnd 1: 6 sc in MR. Pull ring closed. (6 sc)
Rnd 2: 2 sc in each st around. (12 sc)
Rnd 3: (Sc in 1 st, 2 sc in next st) 6 times. (18 sc)
Rnd 4: (Sc in 2 sts, 2 sc in next st) 6 times. (24 sc)
Rnd 5: (Sc in 3 sts, 2 sc in next st) 6 times. (30 sc)
Rnd 6: (Sc in 4 sts, 2 sc in next st) 6 times. (36 sc)
Rnd 7: (Sc in 5 sts, 2 sc in next st) 6 times. (42 sc)
Rnd 8: Sc in each st around. (42 sc)
Rnd 9: (Sc in 6 sts, 2 sc in next st) 6 times. (48 sc)
Rnd 10: Sc in each st around. (48 sc)
Rnd 11: (Sc in 7 sts, 2 sc in next st) 6 times. (54 sc)
Rnd 12: Sc in each st around. (54 sc)
Rnd 13: (Sc in 8 sts, 2 sc in next st) 6 times. (60 sc)
Rnd 14: Sc in each st around. (60 sc)
Rnd 15: (Sc in 9 sts, 2 sc in next st) 6 times. (66 sc)
Rnd 16: Sc in each st around. (66 sc)
Rnd 17: (Sc in 10 sts, 2 sc in next st) 6 times. (72 sc)
Rnd 18: Sc in each st around. (72 sc)
Rnd 19: (Sc in 11 sts, 2 sc in next st) 6 times. (78 sc)
Rnd 20: Sc in each st around. (78 sc)
Rnd 21: (Sc in 12 sts, 2 sc in next st) 6 times. (84 sc) Rnds 22 and 23: Sc in each st around. (84 sc)
Sl st in next st.
Hood Brim Border
Join Yarn B.
Rnd 24: Sc in each st around. (84 sc)
Rnd 25: Work picot edge as for the cape hem. Fasten off.
Seaming the Hood
Whipstitch the hood opening to the collar top edge using Yarn A. The hood opening is 84 stitches and the collar is 43 stitches, so ease the hood evenly around, spacing approximately 2 hood stitches for every 1 collar stitch.
Section 3: Stem and Tendril
Stem
With Yarn C and I-9 hook, chain 16.
Rows 1 through 4: Sc in 2nd ch from hook and each st across. Turn. (15 sc each row)
Join long edges with a sl st seam to form a tube. Stuff lightly. Close the top by running the tail through edge stitches and pulling tight. Sew to the tip of the hood.
Vine Tendril
With Yarn C, chain 24. Work 3 sc in each ch across. (72 sc) The piece coils naturally. Attach next to the stem base.
Section 4: Jack-o-Lantern Face
Using Yarn B and the surface slip stitch technique, create the face on the front of the hood approximately 2.5 in above the brim.
Work two small triangular eyes about 1.5 in apart. Add a smaller nose triangle centered below them. Create a curved smile line about 2 in wide with short vertical lines for the jagged teeth effect.
Section 5: Candy Corn (make 2)
With Yarn D (yellow) and I-9 hook, make a MR.
Rnd 1: 6 sc in MR. (6 sc)
Rnd 2: 2 sc in each st. (12 sc)
Rnd 3: (Sc in 1 st, 2 sc in next st) 6 times. (18 sc) Rnds 4 and 5: Sc in each st around. (18 sc)
Change to Yarn A (orange).
Rnd 6: Sc in each st around. (18 sc)
Rnd 7: (Sc in 4 sts, inv dec) 3 times. (15 sc)
Rnd 8: Sc in each st around. (15 sc)
Change to Yarn E (white).
Rnd 9: (Sc in 3 sts, inv dec) 3 times. (12 sc)
Begin stuffing.
Rnd 10: (Sc in 2 sts, inv dec) 3 times. (9 sc)
Rnd 11: (Sc in 1 st, inv dec) 3 times. (6 sc)
Rnd 12: Inv dec 3 times. (3 sc)
Close tip and fasten off.
Section 6: Final Assembly
Make the twisted cord with Yarn C. Attach one candy corn to each end with the white tip facing up. Thread the cord through the front opening at collar level and tack the center in place. Tie in a bow.
Size Customization Tips
For 12M to 18M: Start with chain 38. Work yoke increases to approximately 133 stitches (stop around Round 33). Cape length will be about 9.5 in.
For 5T to 6T: Start with chain 50. Continue increases to approximately 211 stitches. Cape length will be about 15 in.
Adjust the hood by adding or removing 2 increase rounds to match the new collar size.
Care Instructions
Machine wash on gentle cycle in cool water. Lay flat to dry. Do not tumble dry on high heat or iron directly on the embellishments.
I had such a fun time putting this little cape together, and I hope you love making it too. There’s something so satisfying about watching all the pieces come together into a costume a child will actually want to wear!
If you make this cape, I’d absolutely love to see it. Save this pattern to your Pinterest boards so you can find it when Halloween crafting season rolls around — and come back and tell me how yours turned out. Seeing your creations truly makes my day.
Happy crocheting! Sophie