# Berry Blossom Granny Square Toddler Set Free Crochet Pattern
Oh friends, this set makes me so happy. A sweet pinafore dress paired with a hooded granny square cardigan, both in soft blush pink, dusty rose, burgundy, mauve, and cream. The dress has a solid double crochet skirt that flares gently into an A-line shape, and the cardigan has a waffle stitch hood and ribbed cuffs. Together they’re a coordinated heirloom-quality set for toddlers 18 to 24 months.
This pattern sits at an advanced beginner to intermediate level. You’ll need to be comfortable making granny squares, joining motifs, and working basic garment shaping. The full set takes approximately 30 to 40 hours to complete — a perfect project to work on over several weeks. Both pieces make an absolutely beautiful keepsake, whether for your own little one or the sweetest baby shower gift ever.

What You’ll Need
- DK weight yarn (weight 3) in six colors: Color A (Blush Pink, main) approximately 450 yards / 411 m for the dress plus 350 yards / 320 m for the cardigan; Color B (Dusty Rose) approximately 80 yards / 73 m; Color C (Burgundy/Berry) approximately 120 yards / 110 m; Color D (Mauve Purple) approximately 100 yards / 91 m; Color E (Cream) approximately 80 yards / 73 m; Color F (Deep Dusty Rose/Antique Pink) approximately 90 yards / 82 m
- US G-6 / 4.0 mm hook for granny squares and main fabric
- US E-4 / 3.5 mm hook for ribbed cuffs, edging, and detail work
- Tapestry needle, 6 to 8 stitch markers, scissors, rust-proof pins, measuring tape
Finished size:
- Dress (toddler 18 to 24 months): chest circumference 20 inches / 51 cm
- Length from shoulder to hem approximately 16.5 inches / 42 cm
- Strap length approximately 4.5 inches / 11.5 cm. Cardigan: chest 22 inches / 56 cm (positive ease built in)
- Length from shoulder to hem approximately 14 inches / 35.5 cm
- Sleeve length approximately 9.5 inches / 24 cm
- Hood depth approximately 7.5 inches / 19 cm
The Pattern
Gauge:
- With G-6 / 4.0 mm hook: 14 double crochet x 8 rows = 4 inches / 10 cm in solid double crochet worked flat (turning chain does not count as a stitch). 1 completed granny square (3 rounds) = 3.5 inches / 9 cm square
- Please swatch — gauge is essential for correct finished dimensions on garments
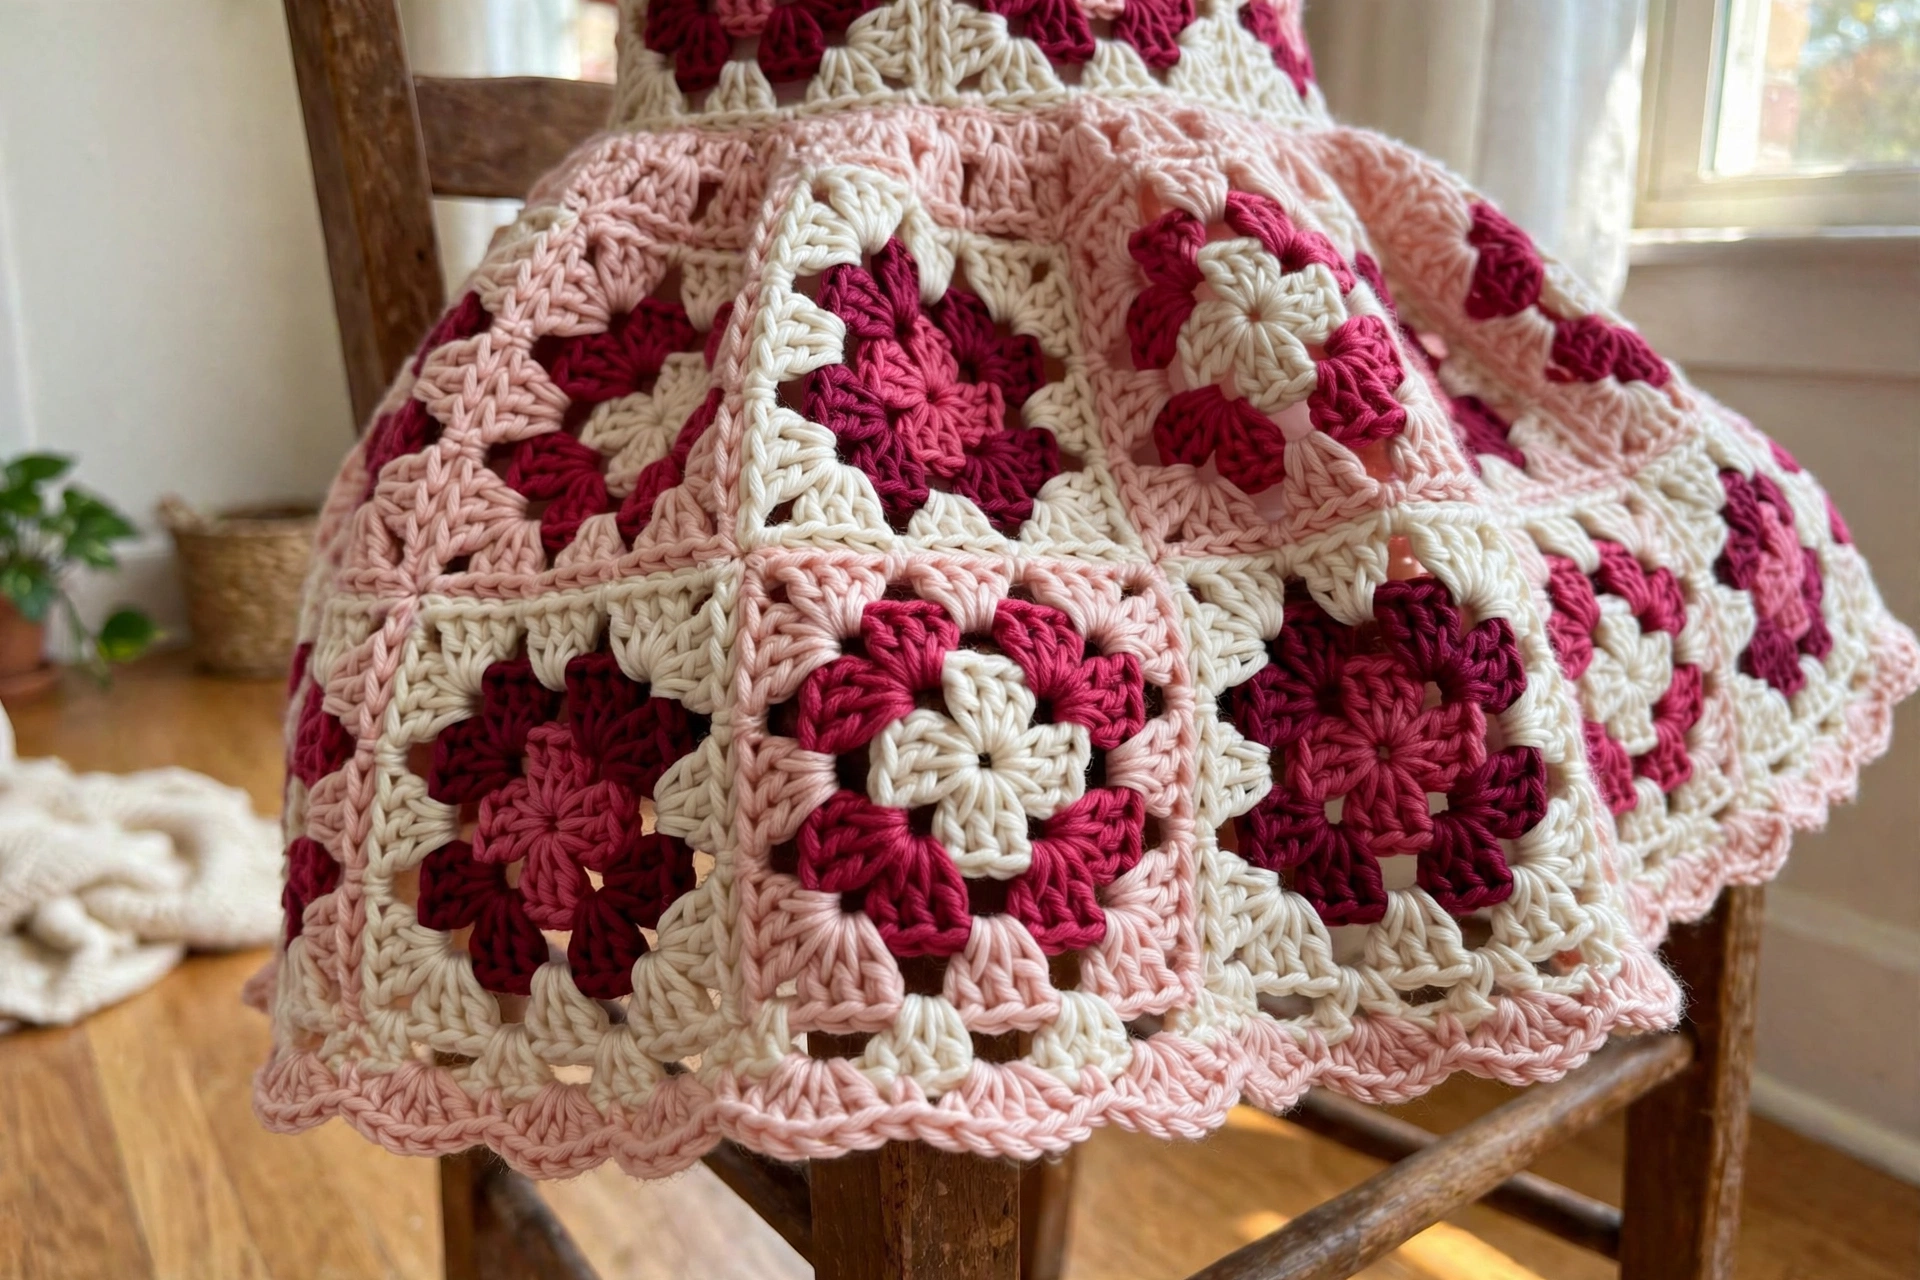
Notes: The turning chain does not count as a stitch anywhere unless explicitly stated. Block all individual squares before assembly. For the cardigan, approximately one-third of the squares have Round 3 worked in Color F instead of Color C — scatter these for an organic, handmade look.
The Granny Square (3-Round Version)
This foundational motif appears throughout both pieces. Each square measures 3.5 inches / 9 cm.
Round 1 (Cream): Make a magic ring (or ch 4 and join to form a ring). Ch 3 (counts as first dc here only). Work 2 dc into the ring. Ch 2. [3 dc into ring, ch 2] three times. Join with sl st to top of beginning ch-3. Fasten off. (12 dc, 4 ch-2 corner spaces)
Round 2 (Mauve Purple): Join with sl st to any ch-2 corner space. Ch 3 (counts as first dc here only). Work 2 dc into same corner space. Ch 2. 3 dc into same corner space. Ch 1. [3 dc, ch 2, 3 dc into next corner space, ch 1] three times. Join with sl st to top of beginning ch-3. Fasten off. (24 dc, 4 ch-2 corner spaces, 4 ch-1 side spaces)
Round 3 (Burgundy/Berry): Join with sl st to any ch-2 corner space. Ch 3 (counts as first dc here only). Work 2 dc into same corner space. Ch 2. 3 dc into same corner space. Ch 1. 3 dc into ch-1 side space. Ch 1. [3 dc, ch 2, 3 dc into next corner space, ch 1, 3 dc into ch-1 side space, ch 1] three times. Join with sl st to top of beginning ch-3. Fasten off. (36 dc, 4 ch-2 corner spaces, 8 ch-1 spaces)
Flat Join
Hold two squares with wrong sides together. Working through both layers, slip stitch through the ch-2 corner space of both squares simultaneously, then slip stitch through each corresponding ch-1 space and double crochet cluster top across the shared edge. This creates a visible but tidy ridge on the right side.
Part One: Berry Blossom Pinafore Dress
#### Top Granny Square Bodice Band
Make 5 standard granny squares. Join them in a horizontal strip using the flat join method. The joined strip measures approximately 17.5 inches / 44.5 cm wide and 3.5 inches / 9 cm tall.
#### Shoulder Straps
With right side facing, join Blush Pink with a slip stitch at the top right corner of the rightmost square. Work 8 sc evenly along the top edge of the first square. (8 sc)
Right strap:
Row 1: Ch 1, turn. Sc across. (8 sc)
Row 2: Ch 1, turn. Sc across. (8 sc) Continue in sc for a total of 14 rows. Fasten off. The strap measures approximately 4.5 inches / 11.5 cm.
Skip the center squares for the neckline opening. Join Blush Pink at the beginning of the fifth (leftmost) square’s top edge. Work 8 sc along its top edge and work the left strap identically for 14 rows. Fasten off.
#### Back Bodice Band
Make 5 more standard granny squares and join them identically to the front band. Attach the strap ends to the back bodice band with whipstitch, positioning left front strap to left back shoulder and right front strap to right back shoulder. Seam the front and back bodice bands along their side edges, leaving the bottom edge open.
Checkpoint: The bodice tube should measure approximately 17.5 inches / 44.5 cm around and approximately 3.5 inches / 9 cm tall.
#### Skirt
Worked in the round from the lower edge of the bodice tube in Blush Pink.
Setup Round: With RS facing, join Blush Pink with a slip stitch to the lower edge of the front bodice band at the right side seam. Work 70 sc evenly distributed around the lower edge of both front and back square bands. Join with sl st to first sc. (70 sc)
Round 1: Ch 2, dc in each st around. Join with sl st to first dc. (70 dc)
Rounds 2-3: Ch 2, dc in each st around. Join. (70 dc)
Round 4 (increase): Ch 2, [dc in next 6 sts, 2 dc in next st] 10 times. Join. (80 dc)
Rounds 5-6: Ch 2, dc in each st around. Join. (80 dc)
Round 7 (increase): Ch 2, [dc in next 7 sts, 2 dc in next st] 10 times. Join. (90 dc)
Rounds 8-9: Ch 2, dc in each st around. Join. (90 dc)
Round 10 (increase): Ch 2, [dc in next 8 sts, 2 dc in next st] 10 times. Join. (100 dc)
Rounds 11-12: Ch 2, dc in each st around. Join. (100 dc)
Round 13 (increase): Ch 2, [dc in next 9 sts, 2 dc in next st] 10 times. Join. (110 dc)
Rounds 14-15: Ch 2, dc in each st around. Join. (110 dc)
Round 16 (increase): Ch 2, [dc in next 10 sts, 2 dc in next st] 10 times. Join. (120 dc)
Rounds 17-18: Ch 2, dc in each st around. Join. (120 dc)
Fasten off Blush Pink.
Checkpoint: The skirt should measure approximately 9.5 inches / 24 cm from the top of the bodice to the lower edge, with a hem circumference of approximately 34 inches / 86 cm.
#### Lower Granny Square Band
Make 10 standard granny squares and join them in a horizontal ring — approximately 35 inches / 89 cm in circumference and 3.5 inches / 9 cm tall. With Blush Pink and a tapestry needle, whipstitch the top edge of the square band to the last round of double crochet on the skirt, spacing the 10 squares evenly around the 120 double crochet.
#### Dress Finishing
Weave in all ends and gently steam block or wet block the dress. The armhole openings are the natural gaps at the side seams — if the edges feel rough, work 1 round of sc in Blush Pink around each armhole opening.
Part Two: Berry Blossom Hooded Cardigan
Make 32 granny squares (about 20 in the standard formula, 12 with Round 3 in Color F for variety). Block all squares.
Join the panels: Back panel: 8 squares (4 wide x 2 tall). Left front panel: 4 squares (2 wide x 2 tall). Right front panel: 4 squares (2 wide x 2 tall). Each sleeve: 6 squares (2 wide x 3 tall) — 12 squares total for both sleeves. Join squares into panels with the flat join method, then seam shoulders, side seams, and set in the sleeves.
#### Hood
Join Blush Pink at the neckline edge. Setup row: Ch 1, work 46 sc evenly around the neckline edge. Turn. (46 sc)
Work the waffle stitch:
Row 1 (RS): Ch 2, dc in first st, \*FPdc around next st, dc in next st;\* repeat across to last st, dc in last st. Turn.
Row 2 (WS): Ch 2, dc in first st, \*BPdc around next post st, dc in next st;\* repeat across to last st, dc in last st. Turn. Repeat Rows 1 and 2 until the hood measures approximately 7.5 inches / 19 cm deep. Fold the hood in half and seam the top closed with whipstitch.
#### Cuffs and Front Bands
With the smaller hook (E-4), join Dusty Rose at each sleeve edge. Work 2 rounds of sc, then 4 rounds of FPdc/BPdc ribbing (alternating front post and back post double crochet) for the cuffs.
For the front bands: with RS facing, pick up sc evenly along each front edge and work 3 rows of sc, adding buttonholes on one side if desired (ch 2, sk 2, spaced evenly). Work a scallop edging along the bottom hem: join Dusty Rose, \*skip 2 sts, 5 dc into next st, skip 2 sts, sl st into next st;\* repeat across. Fasten off.
Sophie’s Tips
- The granny squares are wonderfully portable — stash a few in your purse project bag and make one at a time. They’ll be done before you know it.
- Mix up those outer-round colors on the cardigan squares. The slight variation is what gives it that organic, handmade look instead of “too matchy.”
- Block everything before you seam. Tension differences between squares even out, and joining becomes so much easier.
Thirty to forty hours of cozy stitching, and you end up with an heirloom. That’s a trade I’ll make every time!